 Cấu hình máy chủ Email đơn giản nhất trên Linux
Bài viết này giới thiệu với các bạn về cách cấu hình máy chủ Email đơn giản nhất trên hệ điều hành Linux. Trong bài viết này sẽ giới thiệu với các bạn về email và các giao thức liên quan (SMTP, POP3, IMAP), mục tiêu giúp chúng ta hiểu cách thiết lập 1 email server hoàn chỉnh đơn giản nhất trên bản phân phối CentOS 8 từ đó giúp cho chúng ta có thể tự tìm hiểu và tự học Linux cơ bản một cách dễ dàng hơn.
1.Giới thiệu cấu hình máy chủ Email
Để thiết lập một máy chủ email đơn giản đầy đủ chúng ta sẽ sử dụng Postfix làm máy chủ SMTP, Dovecot để cung cấp chức năng POP/IMAP và RoundCube là một chương trình webmail hoặc ứng dụng khách để người dùng có thể kiểm tra và nhận email từ web.
Trong đó:
Dovecot: là một máy chủ email sử dụng giao thứcIMAPvàPOP3mã nguồn mở cho các hệ thống Linux hoặc UNIX, được viết với mục đích bảo mật chủ yếu.Postfix: Postfix là một mã nguồn mở dùng để định tuyến và chuyển thư điện tử từ máy chủ này sang máy chủ khác qua internet.Roundcube: Khi các thư đã được gửi vào hộp thư, hầu hết người dùng sẽ cần một giao diện dễ sử dụng giúp họ có thể đọc thư. Roundcube là một ứng dụng đa ngôn ngữ dựa trên trình duyệt với giao diện người dùng giống như ứng dụng. Nó cung cấp đầy đủ chức năng mà chúng ta mong đợi từ một ứng dụng email, bao gồm hỗ trợ MIME, sổ địa chỉ, thao tác thư mục, tìm kiếm thư và kiểm tra chính tả.
2. Thiết lập máy chủ Email
Bước 1: Chúng ta cần thực hiện cập nhật và đặt hostname cho máy chủ của chúng ta:
Chúng ta bắt đầu với các gói mới nhất đảm bảo tất cả các bản vá lỗi trước đó được áp dụng:
[root@blogd-net-lab01 ~]# dnf update
CentOS-8 - AppStream                                                                           1.6 MB/s | 7.0 MB     00:04
CentOS-8 - Base                                                                                1.6 MB/s | 2.2 MB     00:01
CentOS-8 - Extras                                                                              6.2 kB/s | 5.9 kB     00:00
Dependencies resolved.
Nothing to do.
Complete!
Thực thi lệnh sau để đặt hostname cho máy chủ:
[root@blogd-net-lab01 ~]# hostnamectl set-hostname mail.blogd.net
Thực hiện khởi động lại máy chủ để áp dụng hostname mới:
[root@blogd-net-lab01 ~]# init 6
Sau khi khởi động lại, chúng ta sẽ kiểm tra hostname đã được cấu hình đúng chưa bằng cách thực thi chuỗi lệnh sau:
[root@mail ~]# hostname
mail.blogd.net
[root@mail ~]# hostname -s
mail
[root@mail ~]# hostname -f
mail.yandex.ru
[root@mail ~]# hostname -A
mail.blogd.net
[root@mail ~]# hostname -i
77.88.21.37 2a02:6b8::a4
[root@mail ~]# cat /etc/hostname
mail.blogd.net
Ngoài ra, kiểm tra xem tên miền có trả lời đúng các truy vấn cục bộ hay không bằng cách thực thi các lệnh bên dưới:
[root@mail ~]# getent ahosts mail.blogd.net
77.88.21.37     STREAM mail.yandex.ru
77.88.21.37     DGRAM
77.88.21.37     RAW
2a02:6b8::a4    STREAM
2a02:6b8::a4    DGRAM
2a02:6b8::a4    RAW
[root@mail ~]# ping blogd.net
PING blogd.net (157.230.45.115) 56(84) bytes of data.
64 bytes from 157.230.45.115 (157.230.45.115): icmp_seq=1 ttl=128 time=358 ms
64 bytes from 157.230.45.115 (157.230.45.115): icmp_seq=2 ttl=128 time=46.9 ms
64 bytes from 157.230.45.115 (157.230.45.115): icmp_seq=3 ttl=128 time=47.1 ms
^C
--- blogd.net ping statistics ---
3 packets transmitted, 3 received, 0% packet loss, time 6ms
rtt min/avg/max/mdev = 46.941/150.849/358.481/146.818 ms
[root@mail ~]# ping mail.blogd.net
PING mail.yandex.ru (77.88.21.37) 56(84) bytes of data.
64 bytes from mail-yandex-ru-production-external.stable.qloud-b.yandex.net (77.88.21.37): icmp_seq=1 ttl=128 time=378 ms
64 bytes from mail-yandex-ru-production-external.stable.qloud-b.yandex.net (77.88.21.37): icmp_seq=2 ttl=128 time=418 ms
^C
--- mail.yandex.ru ping statistics ---
3 packets transmitted, 2 received, 33.3333% packet loss, time 3ms
rtt min/avg/max/mdev = 378.313/398.192/418.072/19.889 ms
Bước 2: Cài đặt postfix, Apache và PHP:
Chúng ta cần chuyển thư để xử lý việc gửi thư từ máy chủ email của chúng ta. Để cài đặt postfix, hãy chạy lệnh dưới đây:
[root@mail ~]# dnf install postfix postfix-mysql httpd vim policycoreutils-python-utils epel-release -y
Last metadata expiration check: 0:01:09 ago on Sat 16 May 2020 11:36:36 AM EDT.
Package vim-enhanced-2:8.0.1763-13.el8.x86_64 is already installed.
Package policycoreutils-python-utils-2.9-3.el8_1.1.noarch is already installed.
Dependencies resolved.
...
PHP sẽ được Roundcube sử dụng để hiển thị các trang trên trình duyệt của bạn và do đó cần phải cài đặt nó. Sau khi PHP được cài đặt, hãy thêm các gói PHP bổ sung như sau:
[root@mail ~]# dnf install -y php-common php-json php-xml php-mbstring php-mysql
Last metadata expiration check: 0:05:21 ago on Sat 16 May 2020 11:42:23 AM EDT.
Package php-common-7.4.6-1.el8.remi.x86_64 is already installed.
Package php-json-7.4.6-1.el8.remi.x86_64 is already installed.
Package php-xml-7.4.6-1.el8.remi.x86_64 is already installed.
Package php-mbstring-7.4.6-1.el8.remi.x86_64 is already installed.
Dependencies resolved.
...
Bước 3: Cấu hình Postfix
Chúng ta cần thực hiện cấu hình postfix để thực hiện việc nhận và gửi thư. Chúng ta sẽ sử dụng trình soạn thảo yêu thích của chúng ta để chỉnh sửa như trình soạn thảo vi:
[root@mail ~]# vi /etc/postfix/master.cf
Chúng ta thực hiện bỏ ghi chú các dòng sau:
submission inet n       -       n       -       -       smtpd
  -o syslog_name=postfix/submission
  -o smtpd_tls_security_level=encrypt
  -o smtpd_sasl_auth_enable=yes
  -o smtpd_tls_auth_only=yes
  -o smtpd_reject_unlisted_recipient=no
  -o smtpd_client_restrictions=$mua_client_restrictions
  -o smtpd_helo_restrictions=$mua_helo_restrictions
  -o smtpd_sender_restrictions=$mua_sender_restrictions
  -o smtpd_recipient_restrictions=
  -o smtpd_relay_restrictions=permit_sasl_authenticated,reject
  -o milter_macro_daemon_name=ORIGINATING
Và thêm dòng sau vào cuối file cấu hình:
dovecot   unix  -       n       n       -       -       pipe
    flags=DRhu user=vmail:vmail argv=/usr/libexec/dovecot/deliver -f ${sender} -d ${recipient}
Chúng ta sẽ cài đặt và cấu hình dovecot. Lưu file sau khi chúng ta đã thực hiện các thay đổi ở trên.
Tiếp theo thực hiện mở file cấu hình /etc/postfix/main.cf để thực hiện các thay đổi sau:
Bỏ ghi chú dòng myhostname và thay thế bằng host.domain.tld tên máy chủ của chúng ta:
myhostname = mail.blogd.net
Thêm tên miền của chúng ta vào như sau:
mydomain = blogd.net ## Input your unique domain here
Bỏ ghi chú hoặc thêm các dòng sau vào file:
myorigin = $myhostname
inet_interfaces = all
inet_interfaces = localhost
inet_protocols = all
mydestination = $myhostname, localhost.$mydomain, localhost
smtpd_recipient_restrictions = permit_mynetworks
home_mailbox = Maildir/
append_dot_mydomain = no
biff = no
config_directory = /etc/postfix
dovecot_destination_recipient_limit = 1
message_size_limit = 4194304
smtpd_tls_key_file = /etc/postfix/ssl/yourkey.key           ##SSL Key
smtpd_tls_cert_file = /etc/postfix/ssl/yourcertificate.crt  ##SSL Cert
smtpd_use_tls=yes
smtpd_tls_session_cache_database = btree:${data_directory}/smtpd_scache
smtp_tls_session_cache_database = btree:${data_directory}/smtp_scache
smtpd_tls_security_level=may
virtual_transport = dovecot
smtpd_sasl_type = dovecot
smtpd_sasl_path = private/auth
Thêm cấu hình sau đây cũng cho phép Postfix truy cập vào dữ liệu liên quan đến tài khoản mà chúng ta sẽ tạo và lưu trữ trong cơ sở dữ liệu:
virtual_mailbox_domains = mysql:/etc/postfix/database-domains.cf
virtual_mailbox_maps = mysql:/etc/postfix/database-users.cf
virtual_alias_maps = mysql:/etc/postfix/database-alias.cf
Bây giờ chúng ta thêm các cấu hình cơ sở dữ liệu vào file dưới đây.
Lưu ý: Cơ sở dữ liệu và bảng sẽ được tạo sau trong bước tiếp theo của hướng dẫn này.
Cho phép Postfix truy cập các tên miền từ cơ sở dữ liệu:
[root@mail ~]# vi /etc/postfix/database-domains.cf

user = postfix_admin
password = StrongPassword
hosts = 127.0.0.1
dbname = postfix_accounts
query = SELECT 1 FROM domains_table WHERE DomainName='%s'
Cho phép Postfix truy cập tài khoản người dùng từ cơ sở dữ liệu:
[root@mail ~]# vi /etc/postfix/database-users.cf

user = postfix_admin
password = StrongPassword
hosts = 127.0.0.1
dbname = postfix_accounts
query = SELECT 1 FROM accounts_table WHERE DomainName='%s'
Cho phép Postfix truy cập bí danh email từ cơ sở dữ liệu:
[root@mail ~]# vi /etc/postfix/database-alias.cf

user = postfix_admin
password = StrongPassword
hosts = 127.0.0.1
dbname = postfix_accounts
query = SELECT Destination FROM alias_table WHERE Source='%s'
Thay đổi quyền sở hữu và quyền của các tệp đã tạo ở trên:
[root@mail ~]# chmod 640 /etc/postfix/database-domains.cf
[root@mail ~]# chmod 640 /etc/postfix/database-users.cf
[root@mail ~]# chmod 640 /etc/postfix/database-alias.cf
[root@mail ~]# chown root:postfix /etc/postfix/database-domains.cf
[root@mail ~]# chown root:postfix /etc/postfix/database-users.cf
[root@mail ~]# chown root:postfix /etc/postfix/database-alias.cf
Chúng ta đã thực hiện các thay đổi mới, chúng ta cần khởi động lại Postfix để tải các cấu hình mới:
[root@mail ~]# systemctl restart postfix
[root@mail ~]# systemctl status postfix.service
● postfix.service - Postfix Mail Transport Agent
   Loaded: loaded (/usr/lib/systemd/system/postfix.service; disabled; vendor preset: disabled)
   Active: active (running) since Sat 2020-05-16 12:43:33 EDT; 4s ago
  Process: 26957 ExecStart=/usr/sbin/postfix start (code=exited, status=0/SUCCESS)
  Process: 26955 ExecStartPre=/usr/libexec/postfix/chroot-update (code=exited, status=0/SUCCESS)
  Process: 26953 ExecStartPre=/usr/libexec/postfix/aliasesdb (code=exited, status=0/SUCCESS)
 Main PID: 27025 (master)
    Tasks: 3 (limit: 11182)
   Memory: 5.6M
   CGroup: /system.slice/postfix.service
           ├─27025 /usr/libexec/postfix/master -w
           ├─27026 pickup -l -t unix -u
           └─27027 qmgr -l -t unix -u
...
Bước 4: Cài đặt và cấu hình MySQL
Roundcube yêu cầu cơ sở dữ liệu để lưu trữ và truy xuất dữ liệu quan trọng. Cài đặt MariaDB bằng cách làm theo hướng dẫn sau:
Cài đặt MariaDB trên CentOS 8. MariaDB là một nhánh của cơ sở dữ liệu MySQL. Chúng ta thực thi lệnh sau đây để cài đặt MariaDB:
[root@mail ~]# dnf install mariadb-server mariadb
Tiếp theo chúng ta cần khởi động MariaDB:
[root@mail ~]# systemctl start mariadb
Thực hiện lệnh bên dưới để có thể cho phép Mariadb khởi động cùng với hệ thống:
[root@mail ~]# systemctl enable mariadb
Created symlink /etc/systemd/system/mysql.service → /usr/lib/systemd/system/mariadb.service.
Created symlink /etc/systemd/system/mysqld.service → /usr/lib/systemd/system/mariadb.service.
Created symlink /etc/systemd/system/multi-user.target.wants/mariadb.service → /usr/lib/systemd/system/mariadb.service.
Kiểm tra trạng thái của Mariadb bằng lệnh sau:
[root@mail ~]# systemctl status mariadb
● mariadb.service - MariaDB 10.3 database server
   Loaded: loaded (/usr/lib/systemd/system/mariadb.service; enabled; vendor preset: disabled)
   Active: active (running) since Fri 2020-03-06 23:08:10 EST; 3min 21s ago
     Docs: man:mysqld(8)
           https://mariadb.com/kb/en/library/systemd/
 Main PID: 4905 (mysqld)
   Status: "Taking your SQL requests now..."
    Tasks: 30 (limit: 11176)
   Memory: 84.6M
   CGroup: /system.slice/mariadb.service
           └─4905 /usr/libexec/mysqld --basedir=/usr

Mar 06 23:07:55 blogd-net-lab01 mysql-prepare-db-dir[4802]: Please report any problems at http://mariadb.org/jira
Mar 06 23:07:55 blogd-net-lab01 mysql-prepare-db-dir[4802]: The latest information about MariaDB is available at http://mariad>
Mar 06 23:07:55 blogd-net-lab01 mysql-prepare-db-dir[4802]: You can find additional information about the MySQL part at:
Mar 06 23:07:55 blogd-net-lab01 mysql-prepare-db-dir[4802]: http://dev.mysql.com
Mar 06 23:07:55 blogd-net-lab01 mysql-prepare-db-dir[4802]: Consider joining MariaDB's strong and vibrant community:
Mar 06 23:07:55 blogd-net-lab01 mysql-prepare-db-dir[4802]: https://mariadb.org/get-involved/
Mar 06 23:07:55 blogd-net-lab01 mysqld[4905]: 2020-03-06 23:07:55 0 [Note] /usr/libexec/mysqld (mysqld 10.3.17-MariaDB) starti>
Mar 06 23:07:55 blogd-net-lab01 mysqld[4905]: 2020-03-06 23:07:55 0 [Warning] Could not increase number of max_open_files to m>
Mar 06 23:07:55 blogd-net-lab01 mysqld[4905]: 2020-03-06 23:07:55 0 [Warning] Changed limits: max_open_files: 1024  max_connec
Chúng ta thực hiện chạy scrip mysql_secure_installation để có thể thực hiện các mục đích sau:
- Thay đổi mật khẩu root
- Xóa user anonymous
- Tắt cho phép root truy cập từ ngoài hệ thống
- Xóa bỏ quyền và database
test - Reload lại các table liên quan đến quyền
Thực hiện như bên dưới:
[root@mail ~]# mysql_secure_installation

NOTE: RUNNING ALL PARTS OF THIS SCRIPT IS RECOMMENDED FOR ALL MariaDB
      SERVERS IN PRODUCTION USE!  PLEASE READ EACH STEP CAREFULLY!

In order to log into MariaDB to secure it, we'll need the current
password for the root user.  If you've just installed MariaDB, and
you haven't set the root password yet, the password will be blank,
so you should just press enter here.

Enter current password for root (enter for none):
OK, successfully used password, moving on...

Setting the root password ensures that nobody can log into the MariaDB
root user without the proper authorisation.

Set root password? [Y/n] Y
New password:
Re-enter new password:
Password updated successfully!
Reloading privilege tables..
 ... Success!


By default, a MariaDB installation has an anonymous user, allowing anyone
to log into MariaDB without having to have a user account created for
them.  This is intended only for testing, and to make the installation
go a bit smoother.  You should remove them before moving into a
production environment.

Remove anonymous users? [Y/n] Y
 ... Success!

Normally, root should only be allowed to connect from 'localhost'.  This
ensures that someone cannot guess at the root password from the network.

Disallow root login remotely? [Y/n] Y
 ... Success!

By default, MariaDB comes with a database named 'test' that anyone can
access.  This is also intended only for testing, and should be removed
before moving into a production environment.

Remove test database and access to it? [Y/n] Y
 - Dropping test database...
 ... Success!
 - Removing privileges on test database...
 ... Success!

Reloading the privilege tables will ensure that all changes made so far
will take effect immediately.

Reload privilege tables now? [Y/n] Y
 ... Success!

Cleaning up...

All done!  If you've completed all of the above steps, your MariaDB
installation should now be secure.

Thanks for using MariaDB!
Khi chúng ta muốn kiểm tra phiên bản của MariaDB:
[root@mail ~]# mysql -V
mysql  Ver 15.1 Distrib 10.3.17-MariaDB, for Linux (x86_64) using readline 5.1
Sau đây chúng ta sẽ thử đăng nhập với user root và password vừa đổi lúc nảy:
[root@mail ~]# mysql -u root -p
Enter password:
Welcome to the MariaDB monitor.  Commands end with ; or \g.
Your MariaDB connection id is 17
Server version: 10.3.17-MariaDB MariaDB Server

Copyright (c) 2000, 2018, Oracle, MariaDB Corporation Ab and others.

Type 'help;' or '\h' for help. Type '\c' to clear the current input statement.

MariaDB [(none)]>
Sau khi MariaDB được cài đặt, chúng ta sẽ tiếp tục định cấu hình nó bằng cách tạo tên người dùng và cơ sở dữ liệu MariaDB để cài đặt Roundcube. Ngoài ra, chúng ta sẽ tạo cơ sở dữ liệu Postfix Mail. Đăng nhập vào MariaDB bằng lệnh:
[root@mail ~]# mysql -u root -p
Cung cấp mật khẩu user root:
[root@mail ~]# mysql -u root -p
Enter password:
Welcome to the MariaDB monitor.  Commands end with ; or \g.
Your MariaDB connection id is 19
Server version: 10.4.13-MariaDB MariaDB Server

Copyright (c) 2000, 2018, Oracle, MariaDB Corporation Ab and others.

Type 'help;' or '\h' for help. Type '\c' to clear the current input statement.
Tạo cơ sở dữ liệu cho các tài khoản Postfix Mail như bên dưới:
MariaDB [(none)]> create database postfix_accounts;
Query OK, 1 row affected (0.001 sec)
Tạo người dùng sở hữu toàn quyền đối với cơ sở dữ liệu tài khoản mail mà chúng ta vừa tạo:
MariaDB [(none)]> grant all on postfix_accounts.* to postfix_admin@localhost identified by 'StrongPassword';
Query OK, 0 rows affected (0.005 sec)

MariaDB [(none)]> flush privileges;
Query OK, 0 rows affected (0.003 sec)
Tạo một bảng trong cơ sở dữ liệu sẽ lưu trữ các tên miền chúng ta muốn máy chủ lưu trữ.
MariaDB [(none)]> CREATE TABLE `postfix_accounts`.`domains_table` ( `DomainId` INT NOT NULL AUTO_INCREMENT , `DomainName` VARCHAR(50) NOT NULL , PRIMARY KEY (`DomainId`)) ENGINE = InnoDB;
Query OK, 0 rows affected (0.018 sec)
Tạo một bảng trong cơ sở dữ liệu sẽ giữ tài khoản người dùng:
MariaDB [(none)]> CREATE TABLE `postfix_accounts`.`accounts_table` (
    ->     `AccountId` INT NOT NULL AUTO_INCREMENT,
    ->     `DomainId` INT NOT NULL,
    ->     `password` VARCHAR(300) NOT NULL,
    ->     `Email` VARCHAR(100) NOT NULL,
    ->     PRIMARY KEY (`AccountId`),
    ->     UNIQUE KEY `Email` (`Email`),
    ->     FOREIGN KEY (DomainId) REFERENCES domains_table(DomainId) ON DELETE CASCADE
    -> ) ENGINE = InnoDB;
Query OK, 0 rows affected (0.018 sec)
Tạo một bảng trong cơ sở dữ liệu sẽ chứa dữ liệu bí danh email.
MariaDB [(none)]> CREATE TABLE `postfix_accounts`.`alias_table` (
    ->     `AliasId` INT NOT NULL AUTO_INCREMENT,
    ->     `DomainId` INT NOT NULL,
    ->     `Source` varchar(100) NOT NULL,
    ->     `Destination` varchar(100) NOT NULL,
    ->     PRIMARY KEY (`AliasId`),
    ->     FOREIGN KEY (DomainId) REFERENCES domains_table(DomainId) ON DELETE CASCADE
    -> ) ENGINE = InnoDB;
Query OK, 0 rows affected (0.017 sec)
Thêm dữ liệu vào các bảng mà chúng ta vừa tạo trong cơ sở dữ liệu Postfix Mail. Bây giờ chúng ta sẽ thêm tên miền của chúng ta, một số tài khoản và bí danh.
MariaDB [(none)]> INSERT INTO `postfix_accounts`.`domains_table` (DomainName) VALUES ('blogd.net');
Query OK, 1 row affected (0.005 sec)

MariaDB [(none)]> INSERT INTO `postfix_accounts`.`accounts_table` (DomainId, password, Email) VALUES (1, ENCRYPT('Password', CONCAT('$6$', SUBSTRING(SHA(RAND()), -16))), 'test1@blogd.net');
Query OK, 1 row affected (0.008 sec)

MariaDB [(none)]> INSERT INTO `postfix_accounts`.`accounts_table` (DomainId, password, Email) VALUES (1, ENCRYPT('Password', CONCAT('$6$', SUBSTRING(SHA(RAND()), -16))), 'test2@blogd.net');
Query OK, 1 row affected (0.006 sec)

MariaDB [(none)]> INSERT INTO `postfix_accounts`.`alias_table` (DomainId, Source, Destination) VALUES (1, 'test3@blogd.net', 'test4@blogd.net');
Query OK, 1 row affected (0.002 sec)
Sau đó, đăng xuất khỏi cơ sở dữ liệu và chuyển sang bước tiếp theo.
MariaDB [(none)]> QUIT
Bye
Chúng ta có thể sử dụng user name và password yêu thích của chúng ta.
Tiếp tực login và vào tạo database cho Roundcube như sau:
[root@mail ~]# mysql -u root -p
Enter password:
Welcome to the MariaDB monitor.  Commands end with ; or \g.
Your MariaDB connection id is 20
Server version: 10.4.13-MariaDB MariaDB Server

Copyright (c) 2000, 2018, Oracle, MariaDB Corporation Ab and others.

Type 'help;' or '\h' for help. Type '\c' to clear the current input statement.

MariaDB [(none)]> create database roundcube;
Query OK, 1 row affected (0.005 sec)

MariaDB [(none)]> grant all on roundcube.* to roundcube_admin@localhost identified by 'StrongPassword';
Query OK, 0 rows affected (0.008 sec)

MariaDB [(none)]> flush privileges;
Query OK, 0 rows affected (0.006 sec)
Kiểm tra cài đặt Posfix mà chúng ta đã thực hiện ở trên. Cơ sở dữ liệu của chúng ta đã được thiết lập, hãy kiểm tra xem cấu hình thực hiện trên Postfix có hoạt động không:
[root@mail ~]# postmap -q blogd.net mysql:/etc/postfix/database-domains.cf
postmap: warning: /etc/postfix/main.cf, line 138: overriding earlier entry: inet_interfaces=all
postmap: warning: /etc/postfix/main.cf, line 750: overriding earlier entry: smtpd_tls_key_file=/etc/pki/tls/private/postfix.key
postmap: warning: /etc/postfix/main.cf, line 751: overriding earlier entry: smtpd_tls_cert_file=/etc/pki/tls/certs/postfix.pem
1
[root@mail ~]# postmap -q test1@blogd.net mysql:/etc/postfix/database-users.cf
postmap: warning: /etc/postfix/main.cf, line 138: overriding earlier entry: inet_interfaces=all
postmap: warning: /etc/postfix/main.cf, line 750: overriding earlier entry: smtpd_tls_key_file=/etc/pki/tls/private/postfix.key
postmap: warning: /etc/postfix/main.cf, line 751: overriding earlier entry: smtpd_tls_cert_file=/etc/pki/tls/certs/postfix.pem
postmap: warning: mysql:/etc/postfix/database-users.cf: query failed: Unknown column 'DomainName' in 'where clause'
postmap: fatal: table mysql:/etc/postfix/database-users.cf: query error: Resource temporarily unavailable
[root@mail ~]# postmap -q test2@blogd.net mysql:/etc/postfix/database-users.cf
postmap: warning: /etc/postfix/main.cf, line 138: overriding earlier entry: inet_interfaces=all
postmap: warning: /etc/postfix/main.cf, line 750: overriding earlier entry: smtpd_tls_key_file=/etc/pki/tls/private/postfix.key
postmap: warning: /etc/postfix/main.cf, line 751: overriding earlier entry: smtpd_tls_cert_file=/etc/pki/tls/certs/postfix.pem
postmap: warning: mysql:/etc/postfix/database-users.cf: query failed: Unknown column 'DomainName' in 'where clause'
postmap: fatal: table mysql:/etc/postfix/database-users.cf: query error: Resource temporarily unavailable
[root@mail ~]# postmap -q test3@blogd.net mysql:/etc/postfix/database-alias.cf
postmap: warning: /etc/postfix/main.cf, line 138: overriding earlier entry: inet_interfaces=all
postmap: warning: /etc/postfix/main.cf, line 750: overriding earlier entry: smtpd_tls_key_file=/etc/pki/tls/private/postfix.key
postmap: warning: /etc/postfix/main.cf, line 751: overriding earlier entry: smtpd_tls_cert_file=/etc/pki/tls/certs/postfix.pem
Bước 5: Cài đặt và cấu hình Dovecot
Như đã trình bày ở trên Dovecot là một máy chủ email IMAP và POP3 mã nguồn mở cho các hệ thống Linux/UNIX. Các giao thức này cung cấp cho người dùng khả năng truy xuất thư từ máy chủ đến máy khách cục bộ của họ và xóa thư khỏi máy chủ. Cài đặt Dovecot như sau:
[root@mail ~]# dnf install dovecot dovecot-mysql -y
Khi chúng ta đã cài đặt thành công chúng ta sẽ thêm 1 user và 1 group để chịu trách nhiệm trong việc xử lí thư:
[root@mail ~]# groupadd -g 6000 vmail
[root@mail ~]# useradd -g vmail -u 6000 vmail -d /home/vmail -m
Dovecot có một số file cấu nình. Chúng ta sẽ thực hiện chỉnh sửa để đảm bảo cho một cấu hình được chính sác.
Mở tệp cấu hình dovecot /ect/dovecot/docecot.conf và đảm bảo các dòng bên dưới không có dấu #:
[root@mail ~]# vi /etc/dovecot/dovecot.conf
!include_try /usr/share/dovecot/protocols.d/*.protocol
protocols = imap pop3 lmtp
!include conf.d/*.conf
!include_try local.conf
Tiếp theo chúng ta sẽ mở tệp cấu hình /etc/dovecot/conf.d/10-auth.conf và thực hiện xóa bỏ dấu # các dòng sau:
[root@mail ~]# vi /etc/dovecot/conf.d/10-auth.conf
disable_plaintext_auth = yes
auth_mechanisms = plain login
!include auth-sql.conf.ext
Kế đến chúng ta sẽ cấu hình vào file /etc/dovecot/conf.d/auth-sql.conf.ext
[root@mail ~]# vi /etc/dovecot/conf.d/auth-sql.conf.ext
passdb {
  driver = sql
  args = /etc/dovecot/dovecot-sql.conf.ext
}
userdb {
  driver = static
  args = uid=vmail gid=vmail home=/home/vmail/%d/%n/Maildir
}
Một vài biến thường được sử dụng:
%u: Tên người dùng.%n: Phần người dùng tronguser@domain, giống như%unếu không có domain.%d: Phần domain tronguser@domain.%h: Thư mục home.
Như file cấu hình trên thì chúng ta sẽ lưu email trong file /home/vmail.
Tiếp theo chúng ta sẽ thực hiện tạo file /home/vmail/blogd.net:
[root@mail ~]# mkdir /home/vmail/blogd.net
Chúng ta sẽ thêm chi tiết cơ sở dữ liệu mà chúng ta đã cấu hình cho postfix trong tệp sau:
[root@mail ~]# vi /etc/dovecot/dovecot-sql.conf.ext
driver = mysql
connect = "host=127.0.0.1 dbname=postfix_accounts user=postfix_admin password=StrongPassword"
default_pass_scheme = SHA512-CRYPT
password_query = SELECT Email as User, password FROM accounts_table WHERE Email='%u';
Tiếp theo sẽ giới thiệu các vị trí và không gian tên của Mailbox. Mở file /etc/dovecot/conf.d/10-mail.conf và đảm bảo các cài đặt được thay đổi tương tự như cấu hình bên dưới:
[root@mail ~]# vi /etc/dovecot/conf.d/10-mail.conf
mail_location = maildir:/home/vmail/%d/%n/Maildir
namespace inbox {
  inbox = yes
}
mail_privileged_group = mail
mbox_write_locks = fcntl
Tiếp theo mở file cấu hình /etc/dovecot/conf.d/10-master.conf thực hiện các thay đổi sau:
[root@mail ~]# vi /etc/dovecot/conf.d/10-master.conf
service imap-login {
  inet_listener imap {
    port = 143
  }
  inet_listener imaps {
  }
}
service pop3-login {
  inet_listener pop3 {
    port = 110
  }
  inet_listener pop3s {
  }
}
service lmtp {
  unix_listener /var/spool/postfix/private/dovecot-lmtp {
   mode = 0600
   user = postfix
   group = postfix
  }
}
service auth {
  unix_listener /var/spool/postfix/private/auth {
    mode = 0666
    user = postfix
    group = postfix
  }
  unix_listener auth-userdb {
   mode = 0600
   user = vmail
  }
  user = dovecot
}
service auth-worker {
  user = vmail
}
service dict {
  unix_listener dict {
  }
}
User vmail sẽ chịu trách nhiệm xử lý thư trong máy chủ. Do đó, người dùng cần truy cập vào vị trí của thư. Cung cấp cho người dùng vmail các quyền cần thiết như dưới đây:
[root@mail ~]# chown -R vmail:vmail /home/vmail
Cấp cho người dùng vmail và dovecot quyền đọc các tệp cấu hình:
[root@mail ~]# chown -R vmail:dovecot /etc/dovecot
[root@mail ~]# chmod -R o-rwx /etc/dovecot
Bước 6: Cài đặt và cấu hình Roundcube
Ứng dụng giúp cho client có thể xem thư của họ chúng ta cần cài đặt Roundcube thực thi các lệnh sau:
[root@mail ~]# VER="1.4.3"
[root@mail ~]# wget https://github.com/roundcube/roundcubemail/releases/download/$VER/roundcubemail-$VER-complete.tar.gz
Khi đã tải xuống thành công chúng ta cần giải nén và thay đổi tên thư mục như sau:
[root@mail ~]# tar xvzf roundcubemail-$VER-complete.tar.gz
[root@mail ~]# mv roundcubemail-$VER roundcube
Tiếp theo hãy di chuyển thư mục mới đến thư mục gốc của Apache, thay đổi quyền sở hữu của nó thành apache và khởi động lại máy chủ web Apache:
[root@mail ~]# mv roundcube /var/www/html/
[root@mail ~]# chown -R apache:apache /var/www/html/
[root@mail ~]# systemctl restart httpd
Để có thể khắc phục SELinux context issues thực thi các lệnh bên dưới:
[root@mail ~]# semanage fcontext -a -t httpd_sys_script_exec_t '/var/www/html(/.*)?'
[root@mail ~]# restorecon -R -v /var/www/html/
Chúng ta cần mở tất cả các cổng cần thiết trên firewall. Trong trường hợp firewall của chúng ta đang chạy, cho phép các cổng sau:
- HTTP: 80
- HTTPS: 443
- SMTP: 25
- POP3: 110
- IMAP: 143
- Bảo mật SMTP: 465
- MSA: 587
- Bảo mật IMAP: 993
Bảo mật POP3: 995
[root@mail ~]# firewall-cmd --permanent --add-port={80,443,25,110,143,465,587,993,995}/tcp
success
[root@mail ~]# firewall-cmd --reload
success
Bước 7 Mở Roundcube trên trình duyệt yêu thích của chúng ta để hoàn thành quá trình cài đặt:
Mở trình duyệt và nhập vào URL sau:
http://IP/roundcube/installer
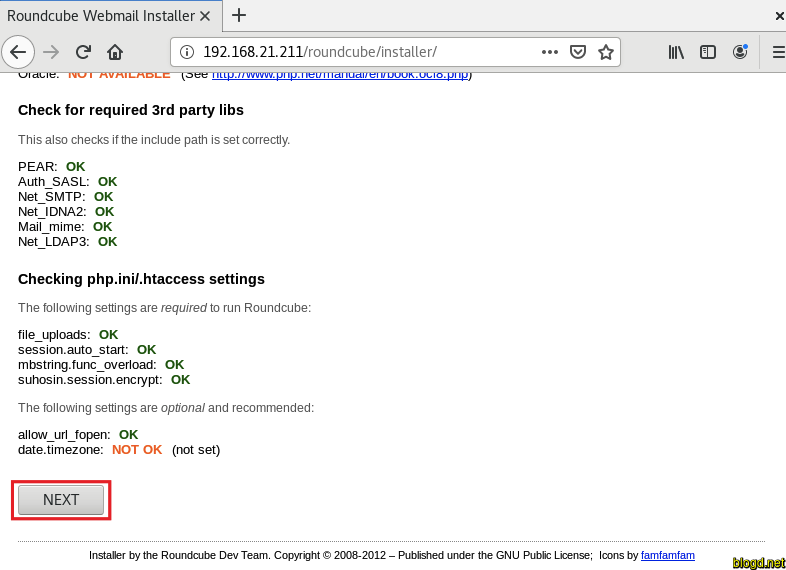
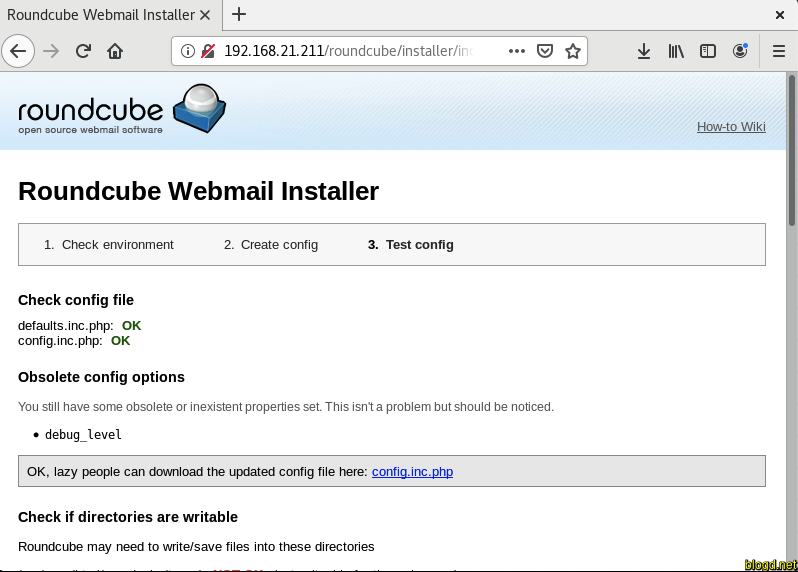
Thực hiện các thao tác như hướng dẫn trong ảnh:
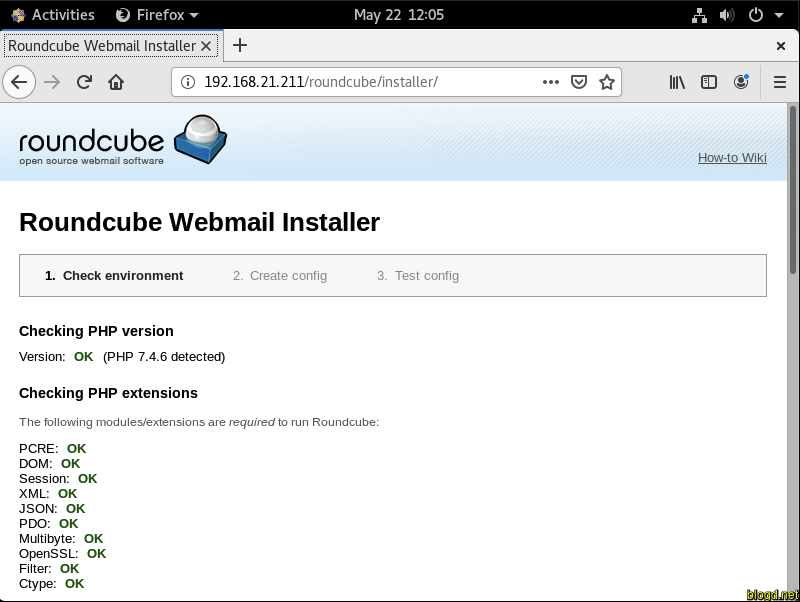
Cần chú ý rằng tất cả các kiểm tra PHP đều ổn. Và nhấp vào Next nếu mọi thứ đều hoạt động tốt.
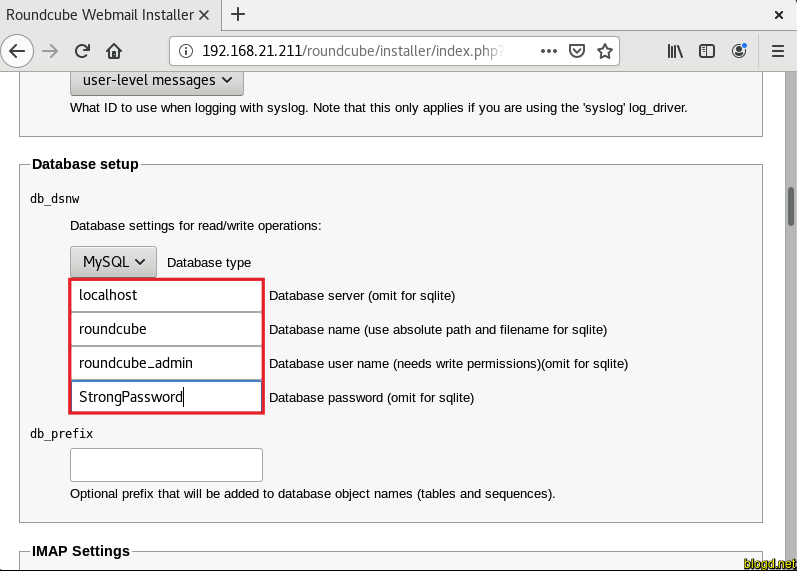
Trên trang tiếp theo, hãy tìm Database Setup và điền vào chi tiết cơ sở dữ liệu Roundcube mà chúng ta đã tạo trước đó. Sau đó, chúng ta có thể thêm configs khác trên trang di chuyển xuống dưới và nhấp vào CREATE CONFIG:

Sang page tiếp theo chúng ta cần download file cấu hình php để thực hiện các setup:
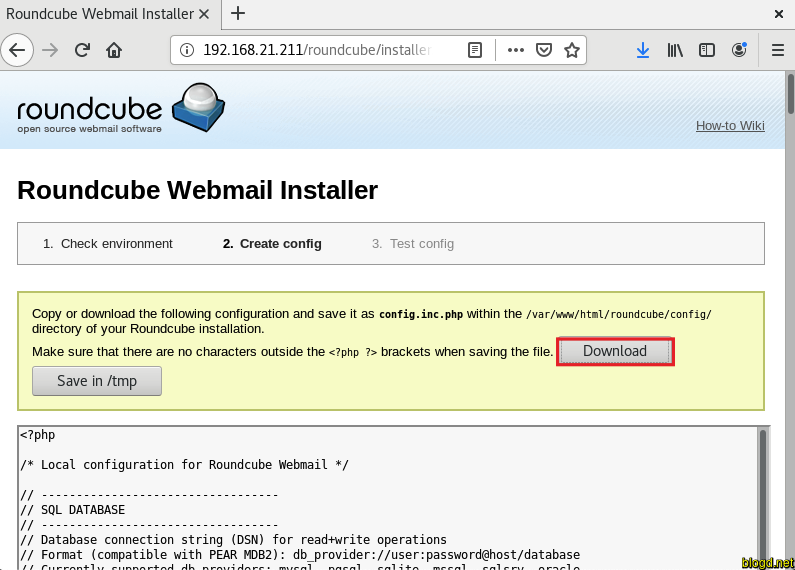
Sau khi download thành công chúng ta cần chuyển nó vào thư mục /var/www/html/roundcube/config/ như sau:
[root@mail ~]# cp /home/dang/Downloads/config.inc.php /var/www/html/roundcube/config/
[root@mail ~]# chown apache:apache /var/www/html/roundcube/config/config.inc.php
Và chọn Continue như hình bên dưới:
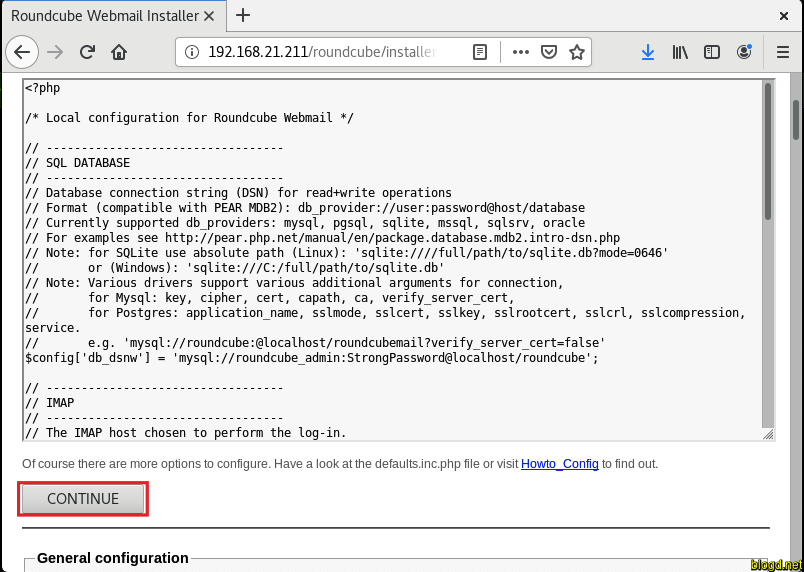
Thực hiện chỉnh sửa file cấu hình bao gồm smtp server, port và logging như bên dưới:
[root@mail ~]# vi /var/www/html/roundcube/config/config.inc.php
$config['default_host'] = 'localhost';  ## If SSL is confgured, use: $config['default_host'] = 'ssl//mail.example.com';
$config['support_url'] = '';
$config['defautl_port'] = 143;
$config['smtp_server'] = 'localhost';   ## If SSL is confgured, use: $config['smtp_server'] = 'tls//mail.example.com';
$config['smtp_port'] = 587;
$config['smtp_user'] = '%u';
$config['smtp_pass'] = '%p';
$config['smtp_auth_type'] = 'LOGIN';
$config['debug_level'] = 1;
$config['smtp_debug'] = true;
$config['plugins'] = array('virtuser_query');
$config['virtuser_query'] = "SELECT Email FROM postfix_accounts.accounts_table WHERE Email = '%u'"; ## Enables Roundcube to use authentication for virtual users for outgoing mail
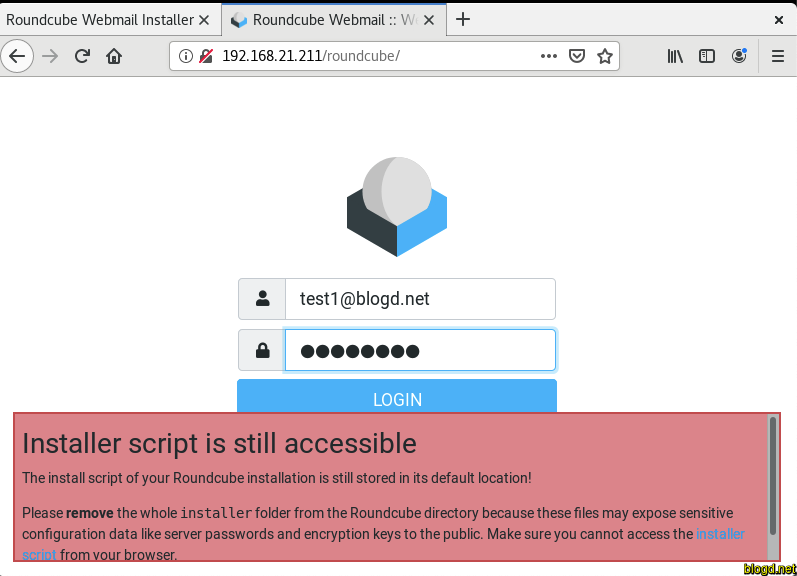
Ở dưới cùng của trang, chúng ta sẽ thấy một biểu ngữ khuyên nên xóa toàn bộ thư mục trình cài đặt sau khi thiết lập thành công Roundcube.
Thực hiện truy cập URL như sau https://IP/roundcube để đăng nhập và sử dụng máy chủ email trên roundcube:
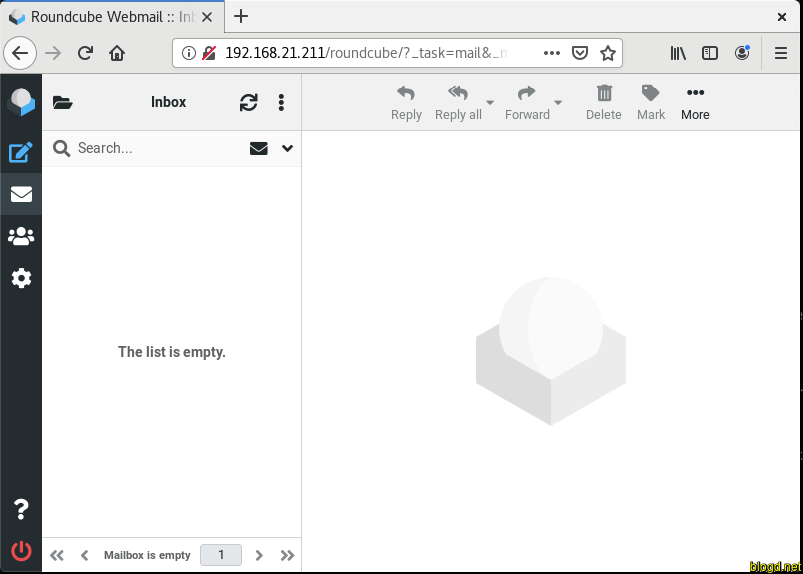
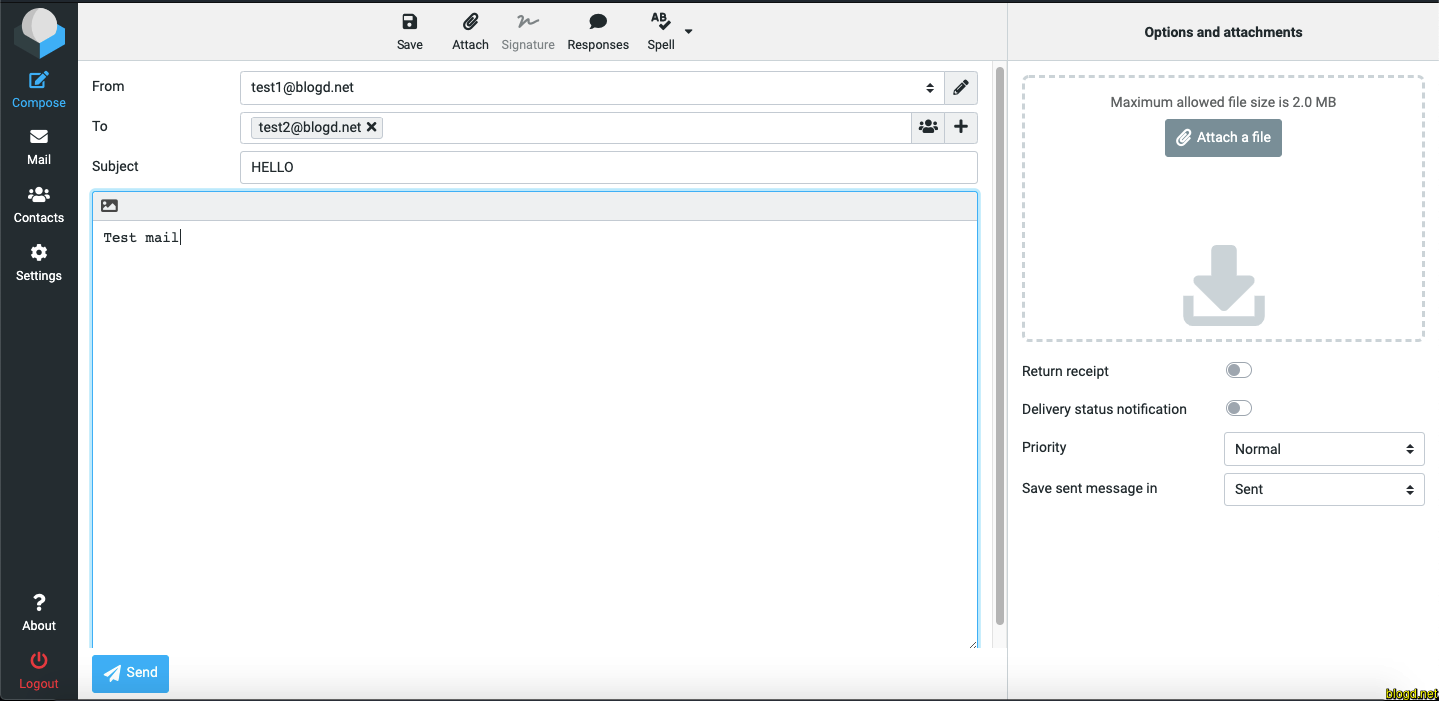
3. Lời kết
Qua bài trên, giúp cho chúng ta cấu hình máy chủ email trên CentOS 8 của hệ điều hành Linux. Từ đây giúp chúng ta có thể tạo một máy chủ email đơn giản nhanh chóng như hướng dẫn bên trên.