 Cài đặt và cấu hình NTP Server trên Linux
Bài viết này giới thiệu với các bạn về cài đặt và cấu hình NTP Server trên hệ điều hành Linux. Trong bài viết này sẽ giới thiệu với các bạn về NTP Server và cách cài đặt NTP trên bản phân phối CentOS 7 từ đó giúp cho chúng ta có thể tự tìm hiểu và tự học Linux cơ bản một cách dễ dàng hơn.
1.Giới thiệu NTP Server
NTP (Network Time Protocol) là một giao thức chạy trên cổng 123 UDP tại Transport Layer nó giúp cho các máy tính trên hệ thống đồng bộ hóa thời gian qua mạng trong một thời gian chính xác. Khi thời gian trôi qua, đồng hồ bên trong của máy tính có xu hướng trôi đi có thể dẫn đến các vấn đề thời gian không nhất quán thì giao thức NTP giúp nó đồng bộ hóa thời gian. Giao thức này được thiết kế để tránh ảnh hưởng của độ trễ biến đổi bằng cách sử dụng bộ đệm jitter.
NTP là một giao thức ra đời trước năm 1985 và vẫn còn được sử dụng. NTP được sáng tạo đầu tiên bởi Dave Mills trường đại học Delaware.
NTP Server là một máy chủ được sử dụng để nhận biết yêu cầu đồng bộ thời gian và phân phối tín hiệu thông tin thời gian.
2. Cài đặt NTP Server
Bước 1: Đầu tiên chúng ta tiến hành cài đặt gói ntp bằng cách chạy lệnh yum như sau:
[root@localhost ~]# yum -y install ntp
Loaded plugins: fastestmirror
Loading mirror speeds from cached hostfile
 * base: centos-hcm.viettelidc.com.vn
 * extras: centos-hcm.viettelidc.com.vn
 * updates: centos-hcm.viettelidc.com.vn
Resolving Dependencies
--> Running transaction check
---> Package ntp.x86_64 0:4.2.6p5-29.el7.centos will be installed
--> Processing Dependency: ntpdate = 4.2.6p5-29.el7.centos for package: ntp-4.2.6p5-29.el7.centos.x86_64
--> Processing Dependency: libopts.so.25()(64bit) for package: ntp-4.2.6p5-29.el7.centos.x86_64
--> Running transaction check
...
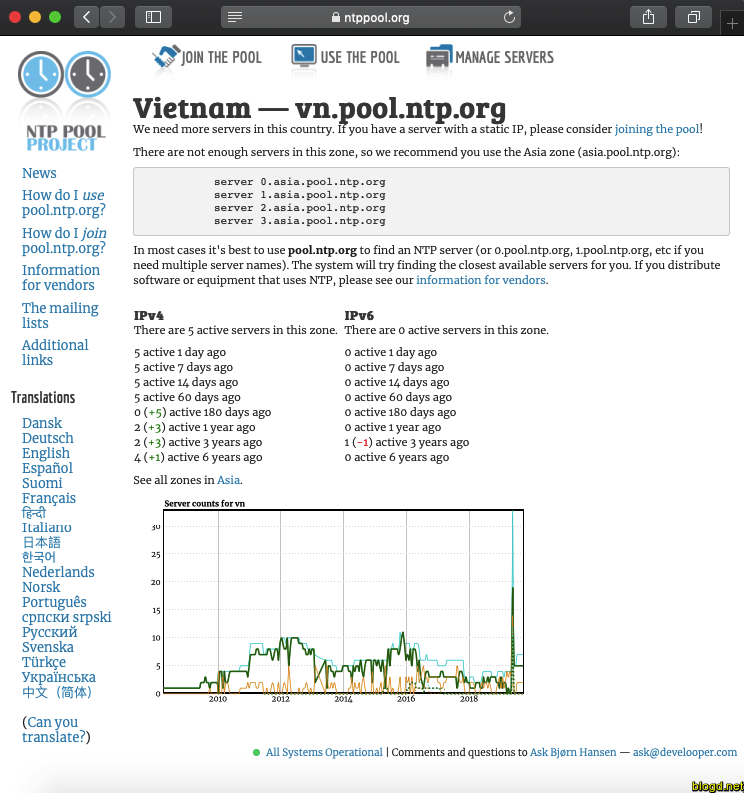
Bước 2: Sau khi cài đặt ntp xong chúng ta truy cập vào NTP Public Pool Time Servers sau đó chọn khu vực nơi đặt máy chủ, tiếp theo chúng ta thực hiện tìm kiếm vị trí quốc gia và danh sách máy chủ NTP sẽ xuất hiện. Tìm kiếm NTP Public Pool Time Servers Việt Nam.
Bước 3: Tiếp theo chúng ta cần thực hiện chỉnh cấu hình ntp bằng cách sử dụng trình soạn thảo văn bản vi để chỉnh sửa file cấu hình chính tên là ntp.conf (/etc/ntp.conf):
File cấu hình ban đầu:
[root@localhost ~]# cat /etc/ntp.conf
# For more information about this file, see the man pages
# ntp.conf(5), ntp_acc(5), ntp_auth(5), ntp_clock(5), ntp_misc(5), ntp_mon(5).

driftfile /var/lib/ntp/drift

# Permit time synchronization with our time source, but do not
# permit the source to query or modify the service on this system.
restrict default nomodify notrap nopeer noquery

# Permit all access over the loopback interface.  This could
# be tightened as well, but to do so would effect some of
# the administrative functions.
restrict 127.0.0.1
restrict ::1

# Hosts on local network are less restricted.
#restrict 192.168.1.0 mask 255.255.255.0 nomodify notrap

# Use public servers from the pool.ntp.org project.
# Please consider joining the pool (http://www.pool.ntp.org/join.html).
server 0.centos.pool.ntp.org iburst
server 1.centos.pool.ntp.org iburst
server 2.centos.pool.ntp.org iburst
server 3.centos.pool.ntp.org iburst

#broadcast 192.168.1.255 autokey	# broadcast server
#broadcastclient			# broadcast client
#broadcast 224.0.1.1 autokey		# multicast server
#multicastclient 224.0.1.1		# multicast client
#manycastserver 239.255.254.254		# manycast server
#manycastclient 239.255.254.254 autokey # manycast client

# Enable public key cryptography.
#crypto

includefile /etc/ntp/crypto/pw

# Key file containing the keys and key identifiers used when operating
# with symmetric key cryptography.
keys /etc/ntp/keys

# Specify the key identifiers which are trusted.
#trustedkey 4 8 42

# Specify the key identifier to use with the ntpdc utility.
#requestkey 8

# Specify the key identifier to use with the ntpq utility.
#controlkey 8

# Enable writing of statistics records.
#statistics clockstats cryptostats loopstats peerstats

# Disable the monitoring facility to prevent amplification attacks using ntpdc
# monlist command when default restrict does not include the noquery flag. See
# CVE-2013-5211 for more details.
# Note: Monitoring will not be disabled with the limited restriction flag.
disable monitor
👉 1️. Đầu tiên chúng ta tìm kiếm máy chủ của quốc gia chúng ta sinh sống "https://www.pool.ntp.org/" và thay thế danh sách máy chủ mặc định trong file ntp.conf bằng danh sách được cung cấp cho quốc gia của chúng ta:
# Use public servers from the pool.ntp.org project.
# Please consider joining the pool (http://www.pool.ntp.org/join.html).
#server 0.centos.pool.ntp.org iburst
#server 1.centos.pool.ntp.org iburst
#server 2.centos.pool.ntp.org iburst
#server 3.centos.pool.ntp.org iburst

   server 0.asia.pool.ntp.org iburst
   server 1.asia.pool.ntp.org iburst
   server 2.asia.pool.ntp.org iburst
   server 3.asia.pool.ntp.org iburst
👉 2️. Theo mặc định thì NTP server sẽ chặn mọi query, peer, modify, trap nhưng chúng ta cần cho phép client từ các mạng của mình đồng bộ hóa thời gian với server nên chúng ta cần edit dòng nằm trong phần # Host on local network are less restricted bằng cách xóa dấu # và thêm các network LAN vào:
Ban đầu
# Hosts on local network are less restricted.
#restrict 192.168.1.0 mask 255.255.255.0 nomodify notrap
Sau khi edit
# Hosts on local network are less restricted.
restrict 192.168.1.0 mask 255.255.255.0 nomodify notrap
👉 3️. Nếu chúng ta cần biết thông tin để khắc phục sự cố về NTP, thì hãy thêm một câu lệnh vào tệp nhật ký vào cuối file ntp.conf nó giúp sẽ chúng ta ghi lại tất cả các sự cố NTP Server gặp phải vào một tệp nhật ký:
logfile /var/log/ntp.log
File cấu hình sau khi chỉnh sửa:
[root@localhost ~]# cat /etc/ntp.conf
# For more information about this file, see the man pages
# ntp.conf(5), ntp_acc(5), ntp_auth(5), ntp_clock(5), ntp_misc(5), ntp_mon(5).

driftfile /var/lib/ntp/drift

# Permit time synchronization with our time source, but do not
# permit the source to query or modify the service on this system.
restrict default nomodify notrap nopeer noquery

# Permit all access over the loopback interface.  This could
# be tightened as well, but to do so would effect some of
# the administrative functions.
restrict 127.0.0.1
restrict ::1

# Hosts on local network are less restricted.
restrict 192.168.1.0 mask 255.255.255.0 nomodify notrap

# Use public servers from the pool.ntp.org project.
# Please consider joining the pool (http://www.pool.ntp.org/join.html).
#server 0.centos.pool.ntp.org iburst
#server 1.centos.pool.ntp.org iburst
#server 2.centos.pool.ntp.org iburst
#server 3.centos.pool.ntp.org iburst

   server 0.asia.pool.ntp.org iburst
   server 1.asia.pool.ntp.org iburst
   server 2.asia.pool.ntp.org iburst
   server 3.asia.pool.ntp.org iburst


#broadcast 192.168.1.255 autokey	# broadcast server
#broadcastclient			# broadcast client
#broadcast 224.0.1.1 autokey		# multicast server
#multicastclient 224.0.1.1		# multicast client
#manycastserver 239.255.254.254		# manycast server
#manycastclient 239.255.254.254 autokey # manycast client

# Enable public key cryptography.
#crypto

includefile /etc/ntp/crypto/pw

# Key file containing the keys and key identifiers used when operating
# with symmetric key cryptography.
keys /etc/ntp/keys

# Specify the key identifiers which are trusted.
trustedkey 4 8 42

# Specify the key identifier to use with the ntpdc utility.
#requestkey 8

# Specify the key identifier to use with the ntpq utility.
#controlkey 8

# Enable writing of statistics records.
#statistics clockstats cryptostats loopstats peerstats

# Disable the monitoring facility to prevent amplification attacks using ntpdc
# monlist command when default restrict does not include the noquery flag. See
# CVE-2013-5211 for more details.
# Note: Monitoring will not be disabled with the limited restriction flag.
disable monitor

logfile /var/log/ntp.log
Bước 4: Chúng ta thực hiện thêm port của NTP đối với dịch dụ firewalld. Do dịch vụ NTP sử dụng cổng UDP 123 trên lớp Transport Layer tầng 4 trong mô hình OSI, vì thế chúng ta cần mở port này trên firewall tương ứng của hệ thống, dưới đây là ví dụ thao tác trên firewalld:
[root@localhost ~]# firewall-cmd --add-service=ntp --permanent
success
[root@localhost ~]# firewall-cmd --reload
success
Bước 5: Sau khi chúng ta đã mở port 123 của dịch dụ firewalld thì chúng ta cần khởi động NTP Daemom trên hệ thống của chúng ta bằng cách thực thi lệnh sau:
[root@localhost ~]# systemctl start ntpd
Khi đã khởi động NTP Server tiếp theo chúng ta thực thi lệnh lệnh dưới để cho NTP Serer khởi động cùng hệ thống:
[root@localhost ~]# systemctl enable ntpd
Created symlink from /etc/systemd/system/multi-user.target.wants/ntpd.service to /usr/lib/systemd/system/ntpd.service.
Tiếp theo chúng ta thực hiện kiểm tra trạng thái của NTP Server:
[root@localhost ~]# systemctl status ntpd
● ntpd.service - Network Time Service
   Loaded: loaded (/usr/lib/systemd/system/ntpd.service; enabled; vendor preset: disabled)
   Active: active (running) since Wed 2019-09-18 23:20:42 +07; 10s ago
 Main PID: 18103 (ntpd)
   CGroup: /system.slice/ntpd.service
           └─18103 /usr/sbin/ntpd -u ntp:ntp -g

Sep 18 23:20:42 localhost.localdomain systemd[1]: Starting Network Time Service...
Sep 18 23:20:42 localhost.localdomain systemd[1]: Started Network Time Service.
Sep 18 23:20:42 localhost.localdomain ntpd[18103]: proto: precision = 0.062 usec
Sep 18 23:20:42 localhost.localdomain ntpd[18103]: 0.0.0.0 c01d 0d kern kernel time sync enabled
Bước 6: Sau khi NTP Sever được khởi động, chúng ta hãy đợi vài phút để server đồng bộ hóa thời gian với server trong danh sách nhóm, sau đó chạy các lệnh sau để xác minh trạng thái đồng bộ hóa NTP và thời gian hệ thống:
[root@localhost ~]# ntpq -p
     remote           refid      st t when poll reach   delay   offset  jitter
==============================================================================
 x.ns.gin.ntt.ne 249.224.99.213   2 u   18   64    1   67.650    5.789   0.425
 ntp.nic.kz      .SHM.            1 u   24   64    1  371.812   -3.974   2.292
*frontier.innola 218.186.3.37     2 u   22   64    1   46.073   19.733   0.297
 ntp.xtom.com.hk 101.231.167.217  2 u   22   64    1   26.797   23.902   0.297
[root@localhost ~]# date -R
Wed, 18 Sep 2019 23:21:35 +0700
Khi chúng ta muốn truy vấn và đồng bộ hóa với nhóm server trong danh sách chạy lệnh ntpdate , theo sau là địa chỉ server hoặc name server:
[root@localhost ~]#  ntpdate -q 0.asia.pool.ntp.org 1.asia.pool.ntp.org
server 211.233.84.186, stratum 2, offset 0.003419, delay 0.11751
server 45.125.1.20, stratum 2, offset -0.011824, delay 0.05411
server 129.250.35.251, stratum 2, offset -0.032068, delay 0.09331
server 211.19.59.28, stratum 2, offset -0.013089, delay 0.10463
server 176.32.196.112, stratum 2, offset -0.059145, delay 0.34055
server 192.248.1.162, stratum 3, offset 0.019954, delay 0.14426
server 37.218.240.198, stratum 2, offset -0.013013, delay 0.05383
server 94.158.54.52, stratum 3, offset -0.041652, delay 0.38792
20 Sep 01:11:54 ntpdate[1583]: adjust time server 37.218.240.198 offset -0.013013 sec
Chúng ta cũng có thể dùng lệnh ntpdate vn.pool.ntp.org để đồng bộ giờ qua cụm máy chủ NTP tại Việt Nam.
Bước 7: Cài đặt NTP trên Client chúng ta thực hiện định cấu hình Windows để đồng bộ hóa thời gian với máy chủ NTP bằng cách: Kích chuột phải vào ngày giờ trên thanh taskbar và chọn Change date and time settings… một hộp thoại Date and Time hiện ra chúng ta chọn vào tab Internet Time rồi chọn Check Synchronize with an Internet time server được như hình bên dưới:
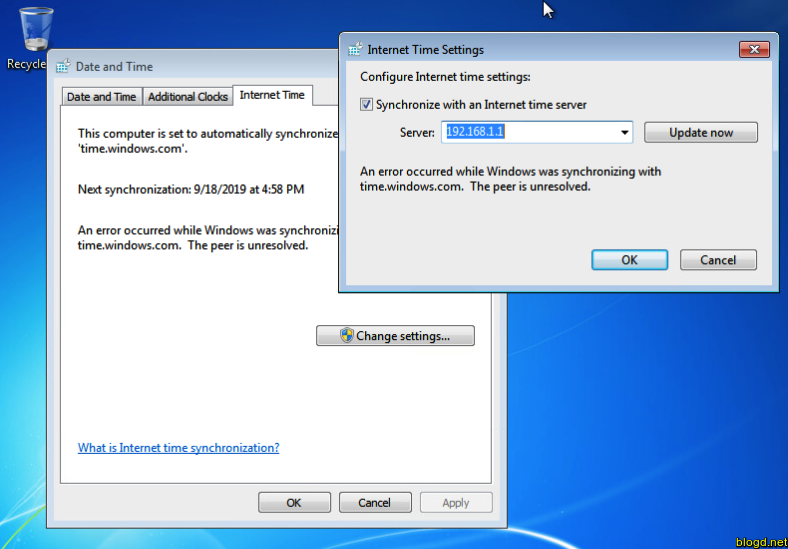
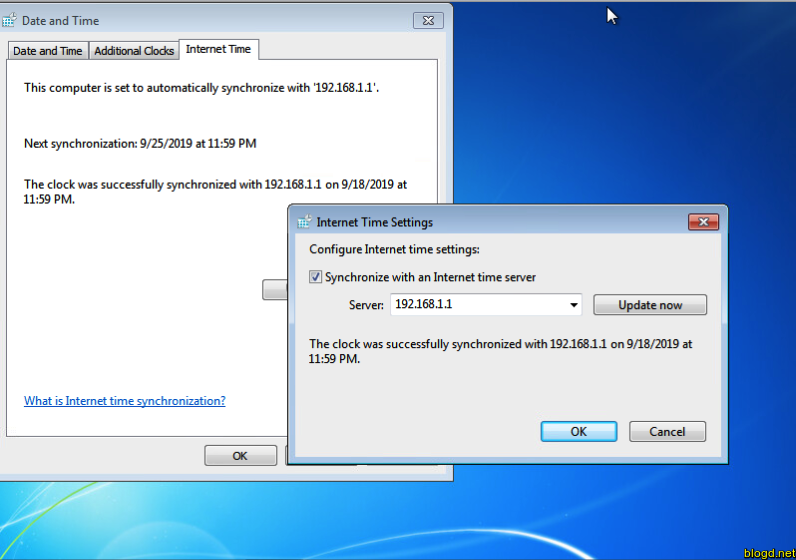
Sau đó chúng ta nhập địa chỉ IP của NTP Server vào ô Server chọn Update now và cuối cùng chọn OK được kết quả như sau:
3. Lời kết
Qua bài trên, giúp cho chúng ta biết được NTP Server trên hệ điều hành Linux. Đồng thời giúp cho chúng ta có thể tự cài đặt NTP Server trên Centos một cách dễ dàng. Giao thức NTP Server giúp cho các máy tính trên hệ thống đồng bộ hóa thời gian qua mạng trong một thời gian chính xác.