 Cài đặt Kubernetes Cluster
![]()
Bài viết này sẽ hướng dẫn cách thiết lập một Kubernetes (k8s) Cluster để bắt đầu tìm hiểu và khám phá Kubernetes. Bài viết cũng hướng dẫn khá chi tiết, từ việc cài đặt công cụ kubectl đến việc thiết lập Single-Node Kubernetes Cluster đơn giản không đòi hỏi nhiều kinh nghiệm bằng cách sử dụng Minikube, Microk8s, kind hoặc thậm chí thiết lập Multi-Node Kubernetes Cluster phức tạp dùng kubeadm hay kops.
1. Hướng dẫn cài đặt kubectl
![]()
kubectl là công cụ dùng để quản lý Kubernetes Cluster, kubectl kết nối với Kubernetes Cluster thông qua Kubernetes API Server. kubectl thông thường dùng file cấu hình tại thư mục .kube trong thư mục $HOME của người dùng hay thông qua biến môi trường KUBECONFIG hoặc qua tham số --kubeconfig. Chúng ta sẽ dùng kubectl khá nhiều trong các loạt bài về Kubernetes, ở đây chúng ta chưa đi vào ví dụ cụ thể, mà chỉ dừng lại ở cách cài đặt kubectl ở các hệ điều hành khác nhau như Linux, macOS hay Windows.
1.1. Cách cài đặt kubectl trên Linux
Để cài đặt kubectl trên các bản phân phối của Linux, chúng ta có thể sử dụng các lệnh sau:
curl -LO https://storage.googleapis.com/kubernetes-release/release/$(curl -s https://storage.googleapis.com/kubernetes-release/release/stable.txt)/bin/linux/amd64/kubectl
chmod +x ./kubectl
mv ./kubectl /usr/local/bin/kubectl
1.2. Cách cài đặt kubectl trên macOS
Để cài đặt kubectl trên macOS, chúng ta có thể cài đặt thủ công hoặc qua Homebrew.
1.2.1. Cài đặt thủ công
Để cài đặt kubectl bản stable mới nhất trên macOS bằng cách cài thủ công, chúng ta thực hiện các lệnh sau:
curl -LO https://storage.googleapis.com/kubernetes-release/release/`curl -s https://storage.googleapis.com/kubernetes-release/release/stable.txt`/bin/darwin/amd64/kubectl
chmod +x ./kubectl
sudo mv ./kubectl /usr/local/bin/kubectl
1.2.2. Cài đặt qua Homebrew
Nếu macOS của chúng ta đang sử dụng Homebrew thì chúng ta có thể cài kubectl dễ dàng bằng một lệnh duy nhất:
brew install kubectl
1.3. Cách cài đặt kubectl trên Windows
Trên Windows, có khá nhiều cách cài đặt kubectl, ở đây chúng ta điểm qua 2 cách cài đặt phổ biến nhất: cài thủ công qua dòng lệnh và cài đặt qua Package Management - Chocolatey.
Lưu ý: Các ví dụ sau được thực hiện trên Windows 10.
1.3.1. Cài đặt thủ công
Chúng ta có thể cài đặt kubectl trên Windows một cách thủ công bằng cách tải kubectl về bằng lệnh trên PowerShell bằng quyền Administrator như sau:
$K8sDst = "$Env:Programfiles\Kubernetes" ; New-Item $K8sDst -ItemType Container; $KubectlVersion = (Invoke-WebRequest -uri https://storage.googleapis.com/kubernetes-release/release/stable.txt -UseBasicParsing).content.Trim()
Invoke-WebRequest -uri "https://storage.googleapis.com/kubernetes-release/release/$KubectlVersion/bin/windows/amd64/kubectl.exe" -OutFile $K8sDst\kubectl.exe
Sau khi tải và lưu kubectl thành công, chúng ta cấu hình đường dẫn nơi chứa kubectl vào biến môi trường $PATH và khởi chạy lại PowerShell bằng cách chạy tiếp các lệnh sau:
[Environment]::SetEnvironmentVariable("Path", $env:Path + ";$K8sDst", [EnvironmentVariableTarget]::Machine)
Start-Process PowerShell ; exit
1.3.2. Cài đặt qua Package Management
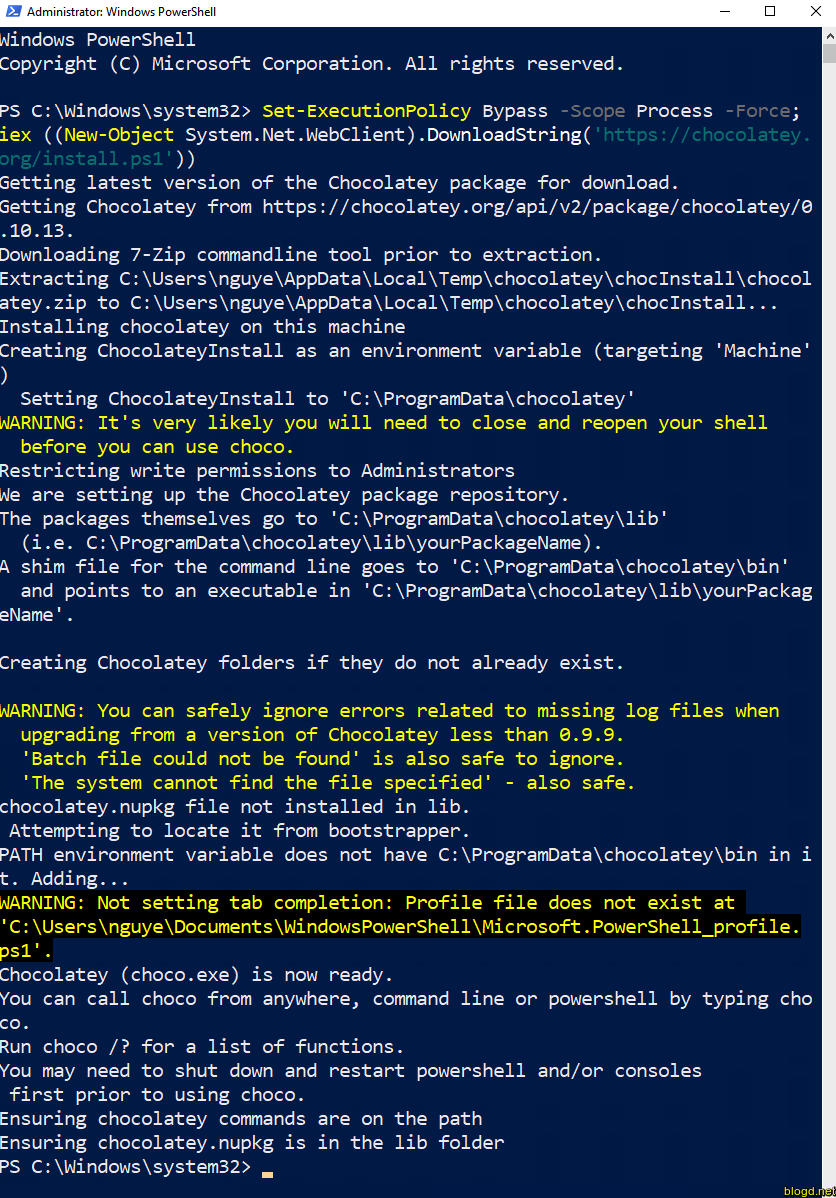
Để cài kubectl trên Windows qua Package Management, ở đây chúng ta dùng Chocolatey, nếu chưa có Chocolatey trên máy thì có thể cài đặt bằng cách chạy lệnh sau trên PowerShell bằng quyền Administrator:
Set-ExecutionPolicy Bypass -Scope Process -Force; iex ((New-Object System.Net.WebClient).DownloadString('https://chocolatey.org/install.ps1'))
Sau khi cài đặt thành công Chocolatey thì sẽ có kết quả tương tự ảnh chụp sau:
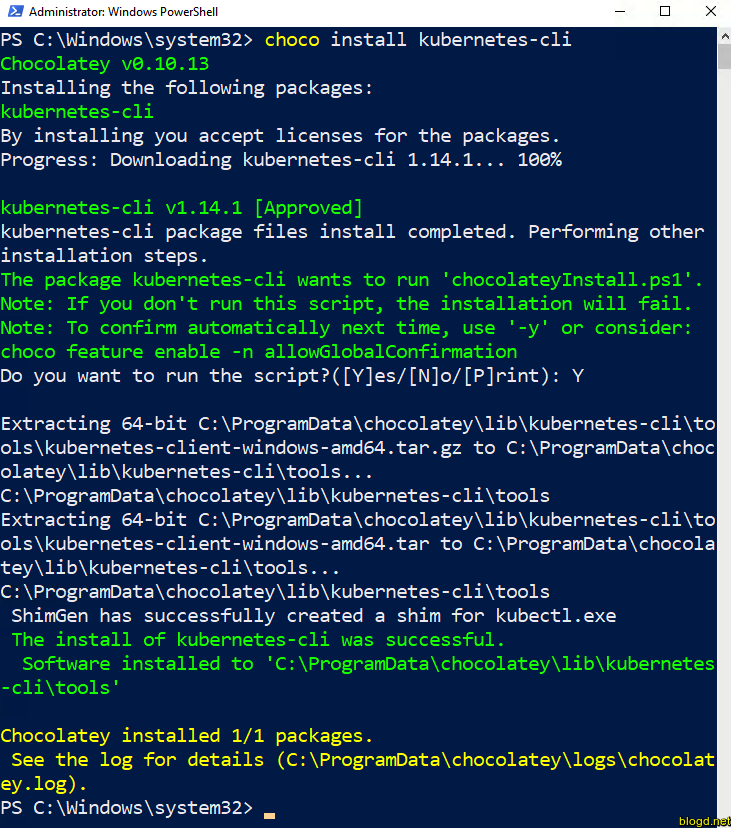
Tiếp theo, để cài kubectl qua Chocolatey thì chúng ta thực hiện duy nhất lệnh sau trên PowerShell bằng quyền Administrator:
choco install kubernetes-cli
Trong qua trình cách đặt thì nhấn Y để xác nhận quá trình cài đặt.
Sau khi cài đặt thành công kubectl thì sẽ có kết quả tương tự ảnh chụp sau:
1.4. Kiểm tra cài đặt kubectl
Sau khi cài đặt kubectl, thì chúng ta có thể kiểm tra xem kubectl có cài đặt thành công và hoạt động trơn tru hay chưa 🧐 bằng lệnh kubectl version --output=yaml:
[root@blogd-lab01 ~]# kubectl version --output=yaml
clientVersion:
  buildDate: "2019-04-08T17:11:31Z"
  compiler: gc
  gitCommit: b7394102d6ef778017f2ca4046abbaa23b88c290
  gitTreeState: clean
  gitVersion: v1.14.1
  goVersion: go1.12.1
  major: "1"
  minor: "14"
  platform: linux/amd64

The connection to the server localhost:8080 was refused - did you specify the right host or port?
Thông báo lỗi không thể kết nối đến server là bình thường vì chúng ta chưa cấu hình thông tin kết nối cho kubectl.
2. Thiết lập Kubernetes Cluster
Kubernetes có thể chạy trên nhiều nền tảng khác nhau, từ máy tính Raspberry Pi nhỏ xíu, Laptop đến trên các VM hay máy chủ vật lý (bare metal server). Để thiết lập một Kubernetes từ việc chạy một lệnh đơn giản đến việc tự tay làm thủ công từ A-Z, chúng ta có thể chọn hướng cài đặt phù hợp nhất với nhu cầu. Nếu chỉ mới tìm hiểu Kubernetes thì có thể dùng Minikube, kind hoặc Microk8s để tạo một Kubernetes Cluster cực kì đơn giản và nhanh chóng, nếu chúng ta đang tìm hiểu Kubernetes để hiểu sâu hoạt động bên trong của nó để thi chứng chỉ Certified Kubernetes Administrator (CKA) hay vận hành một Kubernetes Cluster ở môi trường Production thì có thể dùng kubeadm thuần.
2.1. Minikube
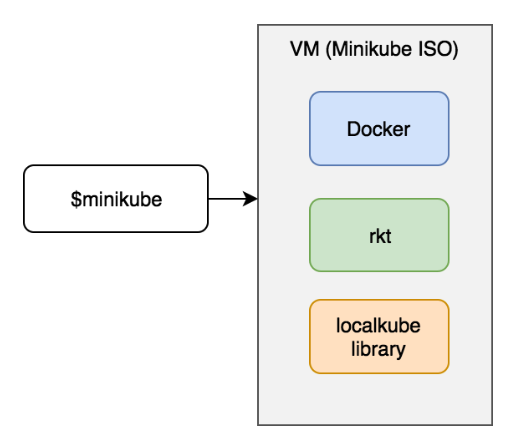
Minikube là công cụ giúp chúng ta chạy Kubernetes Cluster ở local một cách dễ dàng. Minikube sử dụng thư viện libmachine và kubeadm để phát triển. Minikube chạy một Kubernetes Cluster single-node bên trong một máy ảo (VM), nó khá hữu ích với các người dùng mới trải nghiệm hoặc nhà phát triển (developer) làm việc cùng Kubernetes ở máy local dễ dàng.
Minikube hỗ trợ các tính năng sau của Kubernetes:
- DNS
- NodePort
- ConfigMap và Secret
- Dashboard
- Container Runtime: Docker, rkt, CRI-O và containerd
- CNI (Container Network Interface)
- Ingress
Do cơ chế hoạt động chính của Minikube là tạo một VM và chạy Kubernetes Cluster trong đó, vì thế Kubernetes hỗ trợ các driver ảo hóa sau, các loại driver này đều yêu cầu CPU hỗ trợ ảo hóa (Intel VT-x hay AMD-V), ngoại trừ loại none:
virtualboxvmwarefusionkvm2hypervhyperkitnone: loại driver này không dùng ảo hóa, chạy Kubernetes Cluster trực tiếp không qua VM, chỉ hỗ trợ khi chạy trên Linux với Docker cài đặt sẵn. Loại này chỉ thích hợp nếu chạy trong VM hoặc trên máy không mà CPU không hỗ trợ ảo hóa.
Để kết nối với Kubernetes Cluster sau khi Minikube tạo ra, thì chúng ta phải cài kubectl trước hoặc cài đồng thời kubectl lúc cài đặt Minikube.
2.1.1 Cách cài đặt Minikube trên Linux
2.1.1.1 Tải và cài đặt Minikube
Trên Linux, chúng ta có thể tải và cài đặt Minikube dùng lệnh sau:
curl -Lo minikube https://storage.googleapis.com/minikube/releases/latest/minikube-linux-amd64
chmod +x minikube
mv minikube /usr/local/bin/
2.2.1.2 Cài đặt driver ảo hóa cho Minikube
Trên Linux, chúng ta chọn driver ảo hóa kvm trong ví dụ này, chúng ta thực hiện cài các gói cần thiết như sau:
Với CentOS/RHEL/Fedora:
yum install libvirt-daemon-kvm qemu-kvm libvirt virt-install bridge-utilsVới Debian hoặc Ubuntu 18.x trở lên:
sudo apt install libvirt-clients libvirt-daemon-system qemu-kvmVới Ubuntu 16.x trở xuống:
sudo apt install libvirt-bin libvirt-daemon-system qemu-kvm
Tiếp theo, enable và start service libvirtd:
systemctl enable libvirtd.service
systemctl start libvirtd.service
Nếu sau này chúng ta cần chạy Minikube bằng user thường (non-root) thì cần thêm user đó vào group libvirt:
usermod -a -G libvirt ten-user
Sau đó cài đặt driver kvm2 để Minikube có thể sử dụng KVM để tạo VM bằng lệnh sau:
curl -LO https://storage.googleapis.com/minikube/releases/latest/docker-machine-driver-kvm2
install docker-machine-driver-kvm2 /usr/local/bin/
2.2.1.3 Khởi chạy Minikube và tạo Cluster
Chúng ta đã cài đặt driver kvm2 hoàn tất, sau đây chúng ta sẽ khởi chạy Minikube dùng driver này và tạo Kubernetes Cluster bằng cách lệnh sau:
minikube config set vm-driver kvm2
minikube start
Kết quả chạy tương tự như sau:
[root@centos-lab ~]# minikube config set vm-driver kvm2
⚠️  These changes will take effect upon a minikube delete and then a minikube start
[root@centos-lab ~]# minikube start
😄  minikube v1.0.0 on linux (amd64)
🤹  Downloading Kubernetes v1.14.0 images in the background ...
🔥  Creating kvm2 VM (CPUs=2, Memory=2048MB, Disk=20000MB) ...
📶  "minikube" IP address is 192.168.39.137
🐳  Configuring Docker as the container runtime ...
🐳  Version of container runtime is 18.06.2-ce
⌛  Waiting for image downloads to complete ...
✨  Preparing Kubernetes environment ...
💾  Downloading kubeadm v1.14.0
💾  Downloading kubelet v1.14.0
🚜  Pulling images required by Kubernetes v1.14.0 ...
🚀  Launching Kubernetes v1.14.0 using kubeadm ...
⌛  Waiting for pods: apiserver proxy etcd scheduler controller dns
🔑  Configuring cluster permissions ...
🤔  Verifying component health .....
💗  kubectl is now configured to use "minikube"
🏄  Done! Thank you for using minikube!
## Có thể cài thêm Kubernetes Dashboard nếu cần
[root@centos-lab ~]# minikube dashboard
🔌  Enabling dashboard ...
🤔  Verifying dashboard health ...
🚀  Launching proxy ...
🤔  Verifying proxy health ...
Lưu ý: Khi khởi tạo Kubernetes Cluster thành công thì Minikube cũng cấu hình thông tin cho kết nối kubectl tự động.
Giờ đây chúng ta đã có một Kubernetes Cluster trên Linux vừa được tạo bởi Minikube dùng ảo hóa KVM, chúng ta thử dùng kubectl đã cài ở đầu bài để kết nối đến Kubernetes Cluster và thực thi một số lệnh cơ bản:
[root@centos-lab ~]# kubectl get nodes
NAME       STATUS   ROLES    AGE    VERSION
minikube   Ready    master   2m6s   v1.14.0
[root@centos-lab ~]# kubectl version -o json
{
  "clientVersion": {
    "major": "1",
    "minor": "14",
    "gitVersion": "v1.14.1",
    "gitCommit": "b7394102d6ef778017f2ca4046abbaa23b88c290",
    "gitTreeState": "clean",
    "buildDate": "2019-04-08T17:11:31Z",
    "goVersion": "go1.12.1",
    "compiler": "gc",
    "platform": "linux/amd64"
  },
  "serverVersion": {
    "major": "1",
    "minor": "14",
    "gitVersion": "v1.14.0",
    "gitCommit": "641856db18352033a0d96dbc99153fa3b27298e5",
    "gitTreeState": "clean",
    "buildDate": "2019-03-25T15:45:25Z",
    "goVersion": "go1.12.1",
    "compiler": "gc",
    "platform": "linux/amd64"
  }
}
[root@centos-lab ~]# kubectl get pods --all-namespaces
NAMESPACE     NAME                                    READY   STATUS    RESTARTS   AGE
kube-system   coredns-fb8b8dccf-6cw7r                 1/1     Running   1          11m
kube-system   coredns-fb8b8dccf-k4lmr                 1/1     Running   1          11m
kube-system   etcd-minikube                           1/1     Running   0          10m
kube-system   kube-addon-manager-minikube             1/1     Running   0          10m
kube-system   kube-apiserver-minikube                 1/1     Running   0          10m
kube-system   kube-controller-manager-minikube        1/1     Running   0          10m
kube-system   kube-proxy-jgf5m                        1/1     Running   0          11m
kube-system   kube-scheduler-minikube                 1/1     Running   0          10m
kube-system   kubernetes-dashboard-79dd6bfc48-t627p   1/1     Running   0          42s
kube-system   storage-provisioner                     1/1     Running   0          11m
2.1.2. Cách cài đặt Minikube trên macOS
Trên macOS, chúng ta có thể dùng Minikube kết hợp với driver ảo hóa VirtualBox, VMware Fusion, HyperKit. Tuy nhiên ở ví dụ này chúng ta sẽ chỉ sử dụng VirtualBox.
2.1.2.1. Cài đặt Minikube
Cài đặt Minikube thủ công trên macOS:
curl -Lo minikube https://storage.googleapis.com/minikube/releases/latest/minikube-darwin-amd64
chmod +x minikube
sudo mv minikube /usr/local/bin
Nếu có sử dụng Homebrew thì chúng ta có thể cài đặt Minikube bằng Homebrew khá đơn giản bằng lệnh sau:
brew cask install minikube
Sau khi cài đặt xong Minikube, thì chúng ta tải VirtualBox tại đây và hoàn tất cài đặt VirtualBox.
2.1.2.2. Khởi chạy Minikube và tạo Cluster
Chúng ta đã cài đặt Minikube và VirtualBox hoàn tất, sau đây chúng ta sẽ khởi chạy Minikube dùng driver VirtualBox và tạo Kubernetes Cluster bằng các lệnh sau:
minikube config set vm-driver virtualbox
minikube start
Kết quả tương tự như sau:
$ minikube config set vm-driver virtualbox
⚠️  These changes will take effect upon a minikube delete and then a minikube start
$ minikube start
😄  minikube v1.0.0 on darwin (amd64)
🤹  Downloading Kubernetes v1.14.0 images in the background ...
🔥  Creating virtualbox VM (CPUs=2, Memory=2048MB, Disk=20000MB) ...
💿  Downloading Minikube ISO ...
2019/04/29 15:21:28 Unable to read "/Users/hien/.docker/config.json": open /Users/hien/.docker/config.json: no such file or directory
2019/04/29 15:21:28 No matching credentials were found, falling back on anonymous
 142.88 MB / 142.88 MB [============================================] 100.00% 0s
📶  "minikube" IP address is 192.168.99.100
🐳  Configuring Docker as the container runtime ...
🐳  Version of container runtime is 18.06.2-ce
⌛  Waiting for image downloads to complete ...
✨  Preparing Kubernetes environment ...
💾  Downloading kubelet v1.14.0
💾  Downloading kubeadm v1.14.0
🚜  Pulling images required by Kubernetes v1.14.0 ...
🚀  Launching Kubernetes v1.14.0 using kubeadm ...
⌛  Waiting for pods: apiserver proxy etcd scheduler controller dns
🔑  Configuring cluster permissions ...
🤔  Verifying component health .....
💗  kubectl is now configured to use "minikube"
🏄  Done! Thank you for using minikube!
Lưu ý: Khi khởi tạo Kubernetes Cluster thành công thì Minikube cũng cấu hình thông tin cho kết nối kubectl tự động.
Giờ đây chúng ta đã có một Kubernetes Cluster trên macOS vừa được tạo bởi Minikube dùng ảo hóa VirtualBox, chúng ta thử dùng kubectl đã cài ở đầu bài để kết nối đến Kubernetes Cluster và thực thi một số lệnh cơ bản:
$ kubectl version -o json
{
  "clientVersion": {
    "major": "1",
    "minor": "14",
    "gitVersion": "v1.14.1",
    "gitCommit": "b7394102d6ef778017f2ca4046abbaa23b88c290",
    "gitTreeState": "clean",
    "buildDate": "2019-04-08T17:11:31Z",
    "goVersion": "go1.12.1",
    "compiler": "gc",
    "platform": "darwin/amd64"
  },
  "serverVersion": {
    "major": "1",
    "minor": "14",
    "gitVersion": "v1.14.0",
    "gitCommit": "641856db18352033a0d96dbc99153fa3b27298e5",
    "gitTreeState": "clean",
    "buildDate": "2019-03-25T15:45:25Z",
    "goVersion": "go1.12.1",
    "compiler": "gc",
    "platform": "linux/amd64"
  }
}
$ kubectl get nodes
NAME       STATUS   ROLES    AGE     VERSION
minikube   Ready    master   2m57s   v1.14.0
$ kubectl get pods --all-namespaces
NAMESPACE     NAME                               READY   STATUS    RESTARTS   AGE
kube-system   coredns-fb8b8dccf-mv2zm            1/1     Running   0          2m57s
kube-system   coredns-fb8b8dccf-q76sr            1/1     Running   0          2m57s
kube-system   etcd-minikube                      1/1     Running   0          114s
kube-system   kube-addon-manager-minikube        1/1     Running   0          2m8s
kube-system   kube-apiserver-minikube            1/1     Running   0          115s
kube-system   kube-controller-manager-minikube   1/1     Running   0          108s
kube-system   kube-proxy-4x6m2                   1/1     Running   0          2m57s
kube-system   kube-scheduler-minikube            1/1     Running   0          2m9s
kube-system   storage-provisioner                1/1     Running   0          2m54s
2.1.3. Cách cài đặt Minikube trên Windows
Trên Windows, chúng ta có thể sử dùng Minikube cùng với driver ảo hóa Hyper-V hoặc VirtualBox. Ở ví dụ này chúng ta sẽ dùng Minikube với Hyper-V, với các bản Windows không hỗ trợ Hyper-V thì có thể dùng VirtualBox để thay thế.
Lưu ý: Ví dụ sau thực hiện trên Windows 10 Pro. Chạy các lệnh sau trên PowerShell bằng quyền Administrator với các tác vụ liên quan cài đặt và khởi tạo.
2.1.3.1. Cài đặt Minikube
Cài đặt thủ công:
$MinikubeDst = "$Env:Programfiles\Minikube" ; New-Item $MinikubeDst -ItemType Container
Invoke-WebRequest -uri "https://storage.googleapis.com/minikube/releases/latest/minikube-windows-amd64.exe" -OutFile $MinikubeDst\minikube.exe
[Environment]::SetEnvironmentVariable("Path", $env:Path + ";$MinikubeDst", [EnvironmentVariableTarget]::Machine)
Start-Process PowerShell ; exit
Cài đặt qua Chocolatey, nếu chưa có Chocolatey thì tham khảo cách cài đặt tại đây:
choco install minikube
Sau khi cài đặt Minikube thành công thì chúng ta tiến hành bật tính năng Hyper-V trên Windows, khi bật xong tính năng Hyper-V nhớ restart lại 🔃:
Enable-WindowsOptionalFeature -Online -FeatureName Microsoft-Hyper-V-All -NoRestart
Enable-WindowsOptionalFeature -Online -FeatureName Microsoft-Hyper-V-Management-Powershell
2.1.3.2. Khởi chạy Minikube và tạo Cluster
Chúng ta đã cài đặt Minikube và Hyper-V hoàn tất, sau đây chúng ta sẽ khởi chạy Minikube dùng driver Hyper-V và tạo Kubernetes Cluster bằng các lệnh sau:
minikube config set vm-driver hyperv
minikube config set hyperv-virtual-switch "Default Switch"
minikube config set memory 2048
minikube start
Khi khởi tạo thành công sẽ có kết quả tương tự ảnh chụp sau:
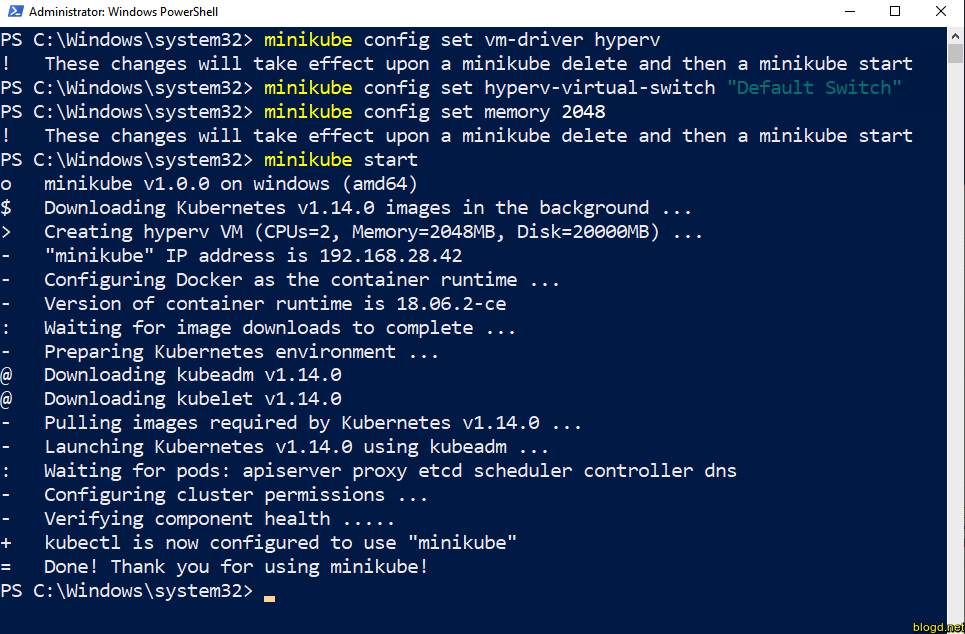
Lưu ý: Khi khởi tạo Kubernetes Cluster thành công thì Minikube cũng cấu hình thông tin cho kết nối kubectl tự động.
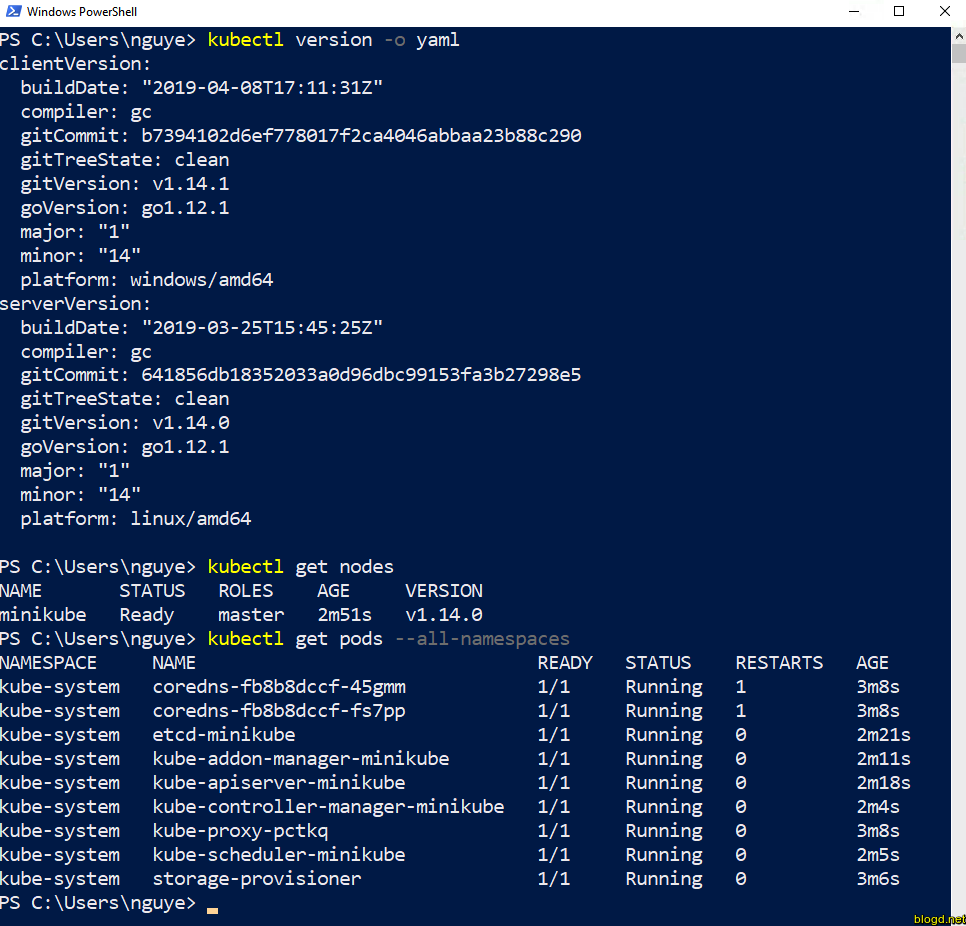
Giờ đây chúng ta đã có một Kubernetes Cluster trên Windows vừa được tạo bởi Minikube dùng ảo hóa Hyper-V, chúng ta thử dùng kubectl đã cài ở đầu bài để kết nối đến Kubernetes Cluster và thực thi một số lệnh cơ bản:
2.1.4. Sử dụng Minikube
Trong quá trình sử dụng Minikube, các lệnh quản lý Kubernetes Cluster sẽ dùng lệnh kubectl. Tuy nhiên có một số thao tác liên quan đặc thù của Minikube như sau:
Tạm tắt Minikube
minikube stopKhởi chạy lại Minikube
minikube startCài đặt và mở Kubernetes Dashboard:
minikube dashboardXóa cụm Kubernetes Cluster tạo bởi Minikube:
minikube deleteXem hướng dẫn của Minikube:
minikube --help
2.2. Microk8s

Microk8s là một công cụ do Canonical phát triển và cho ra mắt cộng đồng vào năm 2018. Microk8s cho phép chúng ta tạo một Kubernetes Cluster trên máy local một cách nhanh chóng, không cần các nền tảng ảo hóa cồng kềnh. Microk8s hỗ trợ khá nhiều tính năng thêm dạng addon cho Kubernetes Cluster mà nó tạo ra nếu so sánh mới Minikube:
- dns
- dashboard
- storage
- ingress
- gpu
- istio
- registry
- metrics-server
- prometheus
- fluentd
- jaeger
- linkerd
2.2.1. Cài đặt Microk8s và khởi tạo Kubernetes Cluster
Microk8s có thể được cài đặt qua Snap, các bản Ubuntu từ 16.04 trở đi thường cài sẵn Snap, nếu bạn chưa có Snap thì có thể tham khảo cách cài đặt Snap tại đây. Với Microk8s, chúng ta không cần phải cài kubectl trước vì Microk8s đã có kèm sẵn kubectl.
Tiến hành cài đặt Microk8s qua Snap bằng lệnh sau:
snap install microk8s --classic
Sau khi cài đặt xong chúng ta có thể dùng lệnh microk8s.status để xem trạng thái các kubernetes service:
root@blogd-ubuntu-18-04-lab:~# microk8s.status
microk8s is running
addons:
jaeger: disabled
fluentd: disabled
gpu: disabled
storage: disabled
registry: disabled
ingress: disabled
dns: disabled
metrics-server: disabled
prometheus: disabled
istio: disabled
dashboard: disabled
Khi cài đặt xong, chúng ta có thể dùng công cụ kubectl đi kèm Microk8s có tên là microk8s.kubectl để truy vấn đế Kubernetes Cluster vừa được tạo ra:
root@blogd-ubuntu-18-04-lab:~# microk8s.kubectl get nodes
NAME                     STATUS   ROLES    AGE     VERSION
blogd-ubuntu-18-04-lab   Ready    <none>   4m57s   v1.14.1
root@blogd-ubuntu-18-04-lab:~# microk8s.kubectl get services
NAME         TYPE        CLUSTER-IP     EXTERNAL-IP   PORT(S)   AGE
kubernetes   ClusterIP   10.152.183.1   <none>        443/TCP   4m56s
root@blogd-ubuntu-18-04-lab:~# microk8s.kubectl version -o json
{
  "clientVersion": {
    "major": "1",
    "minor": "14",
    "gitVersion": "v1.14.1",
    "gitCommit": "b7394102d6ef778017f2ca4046abbaa23b88c290",
    "gitTreeState": "clean",
    "buildDate": "2019-04-08T17:11:31Z",
    "goVersion": "go1.12.1",
    "compiler": "gc",
    "platform": "linux/amd64"
  },
  "serverVersion": {
    "major": "1",
    "minor": "14",
    "gitVersion": "v1.14.1",
    "gitCommit": "b7394102d6ef778017f2ca4046abbaa23b88c290",
    "gitTreeState": "clean",
    "buildDate": "2019-04-08T17:02:58Z",
    "goVersion": "go1.12.1",
    "compiler": "gc",
    "platform": "linux/amd64"
  }
}
Chúng ta vẫn có thể tạo alias cho lệnh microk8s.kubectl là kubectl để quen thuộc và dễ dùng hơn:
root@blogd-ubuntu-18-04-lab:~# snap alias microk8s.kubectl kubectl
Added:
  - microk8s.kubectl as kubectl
Trong trường hợp chúng ta đã cài kubectl như hướng dẫn ở các phần trên, thì chúng ta vẫn có thể tiếp tục dùng cung cụ này bằng cách export thông tin kết nối Kubernetes Cluster từ Microk8s vào kubectl bằng lệnh sau:
microk8s.kubectl config view --raw > $HOME/.kube/config
2.2.2. Sử dụng Microk8s
Trong quá trình sử dụng Microk8s, các lệnh quản lý Kubernetes Cluster thông qua kubectl. Tuy nhiên có một số thao tác liên quan đặc thù của Microk8s như sau:
Tắt tạm thời Microk8s:
microk8s.stopKhởi chạy lại Microk8s:
microk8s.startBật/tắt addon dùng lệnh
microk8s.enablevàmicrok8s.disable. Ví dụ sau bật addon dns, dashboard, istio:root@blogd-ubuntu-18-04-lab:~# microk8s.enable dns Enabling DNS Applying manifest service/kube-dns unchanged serviceaccount/kube-dns unchanged configmap/kube-dns unchanged deployment.extensions/kube-dns configured Restarting kubelet DNS is enabled root@blogd-ubuntu-18-04-lab:~# microk8s.enable dashboard Enabling dashboard secret/kubernetes-dashboard-certs unchanged serviceaccount/kubernetes-dashboard unchanged deployment.apps/kubernetes-dashboard unchanged service/kubernetes-dashboard unchanged service/monitoring-grafana unchanged service/monitoring-influxdb unchanged service/heapster unchanged deployment.extensions/monitoring-influxdb-grafana-v4 unchanged serviceaccount/heapster unchanged configmap/heapster-config unchanged configmap/eventer-config unchanged deployment.extensions/heapster-v1.5.2 unchanged dashboard enabled root@blogd-ubuntu-18-04-lab:~# microk8s.enable istio Enabling Istio Enabling DNS Applying manifest service/kube-dns unchanged serviceaccount/kube-dns unchanged configmap/kube-dns unchanged deployment.extensions/kube-dns configured Restarting kubelet DNS is enabled ... ... kubernetes.config.istio.io/attributes created destinationrule.networking.istio.io/istio-policy created destinationrule.networking.istio.io/istio-telemetry created Istio is startingXóa Microk8s và Kubernetes Cluster mà Microk8s đã tạo ra:
microk8s.reset
snap remove microk8s
Có thể tham khảo thêm tài liệu chính thức của Microk8s tại đây.
2.3. Kubernetes IN Docker (kind)
![]()
Kubernetes IN Docker hay gọi tắt là kind là công cụ cho phép tạo Kubernetes Cluster ở local sử dụng những Docker Container làm "node". kind ban đầu được thiết kế chính để test Kubernetes 1.11 trở lên.
2.3.1. Cài đặt kind
Lưu ý: Ví dụ sau được thực hiện trên CentOS 7.
Bước 1: Cài đặt Go và Docker.
yum install -y epel-release
yum install -y go yum-utils device-mapper-persistent-data lvm2
yum-config-manager --add-repo https://download.docker.com/linux/centos/docker-ce.repo
yum install -y docker-ce docker-ce-cli containerd.io
systemctl start docker
systemctl enable docker
Bước 2: Cài đặt kind .
go get -u sigs.k8s.io/kind
ln -sf $(go env GOPATH)/bin/kind /usr/local/bin/kind
2.3.2. Khởi tạo Kubernetes Cluster
Để khởi tạo một Kubernetes Cluster chúng ta sẽ dùng lệnh kind create cluster kèm tham số --name nếu chúng ta cần đặt tên cho Cluster, nếu không thì sẽ có tên mặc định là "kind":
[root@blogd-lab09 ~]# kind create cluster --name blogd-test-cluster
Creating cluster "blogd-test-cluster" ...
 ✓ Ensuring node image (kindest/node:v1.13.4) 🖼
 ✓ Preparing nodes 📦
 ✓ Creating kubeadm config 📜
 ✓ Starting control-plane 🕹️
Cluster creation complete. You can now use the cluster with:

export KUBECONFIG="$(kind get kubeconfig-path --name="blogd-test-cluster")"
kubectl cluster-info
Chúng ta đã tạo thành công một Kubernetes Cluster dùng kind, hãy thử kết nối nối và truy vấn thử bằng kubectl:
[root@blogd-lab09 ~]# export KUBECONFIG="$(kind get kubeconfig-path --name="blogd-test-cluster")"
[root@blogd-lab09 ~]# kubectl cluster-info
Kubernetes master is running at https://localhost:41846
KubeDNS is running at https://localhost:41846/api/v1/namespaces/kube-system/services/kube-dns:dns/proxy

To further debug and diagnose cluster problems, use 'kubectl cluster-info dump'.
[root@blogd-lab09 ~]# kubectl get pods --all-namespaces
NAMESPACE     NAME                                                       READY   STATUS    RESTARTS   AGE
kube-system   coredns-86c58d9df4-2pt9p                                   1/1     Running   0          8m51s
kube-system   coredns-86c58d9df4-dh7sz                                   1/1     Running   0          8m51s
kube-system   etcd-blogd-test-cluster-control-plane                      1/1     Running   0          8m18s
kube-system   kube-apiserver-blogd-test-cluster-control-plane            1/1     Running   0          7m57s
kube-system   kube-controller-manager-blogd-test-cluster-control-plane   1/1     Running   0          7m56s
kube-system   kube-proxy-w8cc4                                           1/1     Running   0          8m52s
kube-system   kube-scheduler-blogd-test-cluster-control-plane            1/1     Running   0          8m1s
kube-system   weave-net-hzzt5                                            2/2     Running   1          8m52s
[root@blogd-lab09 ~]# kubectl get nodes
NAME                               STATUS   ROLES    AGE    VERSION
blogd-test-cluster-control-plane   Ready    master   9m7s   v1.13.4
2.3.3. Sử dụng kind
Trong quá trình sử dụng kind, các lệnh quản lý Kubernetes Cluster thông qua kubectl. Tuy nhiên có một số thao tác liên quan đặc thù của kind như sau:
Liệt kê các Kubernetes Cluster mà kind đã tạo ra:
kind get clustersXóa Cluster, nếu tham số
--namekhông được khai báo thì kind sẽ xóa cluster có tên mặc định là "kind":kind delete cluster
kind là dự án khá trẻ và còn trong quá trình phát triển, có thể tham khảo thêm tài liệu về kind tại đây.
2.4. kubeadm
![]()
kubeadm là công cụ giúp bootstrap một Kubernetes Cluster. kubeadm cho phép tùy biến cao trong quá trình cài đặt Kubernetes Cluster, nó hỗ trợ multi-node thậm chí multi-master. kubeadm là công cụ đáp ứng đầy đủ yêu cầu của chương trình Certified Kubernetes Conformance từ năm 2017. Ngoài ra, kubeadm còn hỗ trợ các chức năng khác của vòng đời Kubernetes Cluster như nâng cấp, hạ cấp và quản lý bootstrap token. Tuy nhiên, sử dụng trực tiếp kubeadm sẽ có một chút phức tạp hơn các công cụ như Minikube, kind hay Microk8s, vì nó đòi hỏi bạn am hiểu về thành phần và kiến trúc của Kubernetes để hiểu quá trình cài đặt lẫn xử lý lỗi phát sinh.
Ở trong ví dụ minh họa bên dưới, chúng ta sẽ tạo ra Kubernetes Cluster bao gồm 1 Master Node và 2 Worker Node:
- VM k8s-master01 (10.124.11.17): đóng vai trò Master Node.
- VM k8s-worker01 (10.124.11.28) và k8s-worker02 (10.124.11.38): đóng vai trò Worker Node.
Lưu ý: Ví dụ này được tiến hành trên CentOS 7.6.x cùng Kubernetes 1.14.x.
Quá trình cài đặt này hoàn toàn có thể sử dụng các công cụ configuration management như Ansible hay SaltStack để hệ thống hóa và có khả năng tái sử dụng (reusable). Tuy nhiên để đơn giản cho các và dễ hiểu cho mọi đối tượng người đọc, chúng ta sẽ tiến hành cài đặt thủ công ví dụ này.
2.4.1. Cài đặt các gói phần mềm và thiết lập ban đầu
2.4.1.1. Master Node
Chúng ta sẽ cài đặt các gói phụ thuộc cho Master Node, các thao tác sau được thực hiện trên VM k8s-master01 (10.124.11.17):
Tắt swap: Nên tắt swap để kubelet hoạt động ổn định.
swapoff -a
sed -i.bak /swap/s/^/#/ /etc/fstab
Tắt SELinux:
setenforce 0
sed -i 's/^SELINUX=enforcing$/SELINUX=permissive/' /etc/selinux/config
Container Runtime, ở đây chúng ta chọn Docker để cài và cấu hình ban đầu (vẫn có các container runtime khác như containerd hay CRI-O):
yum install -y yum-utils device-mapper-persistent-data lvm2
yum-config-manager --add-repo https://download.docker.com/linux/centos/docker-ce.repo
yum install -y docker-ce
mkdir /etc/docker
cat > /etc/docker/daemon.json <<EOF
{
 "exec-opts": ["native.cgroupdriver=systemd"],
 "log-driver": "json-file",
 "log-opts": {
 "max-size": "100m"
 },
 "storage-driver": "overlay2",
 "storage-opts": [
   "overlay2.override_kernel_check=true"
 ]
}
EOF
mkdir -p /etc/systemd/system/docker.service.d

systemctl daemon-reload
systemctl restart docker
systemctl enable docker
Cài đặt kubelet, kubeadm và kubectl (kubectl có thể cài ở bất kì ở đâu có khả năng kết nối đến Kubernetes API Server để quản lý Cluster, ở đây chúng ta sử dụng ngay chính Master Node):
cat <<EOF > /etc/yum.repos.d/kubernetes.repo
[kubernetes]
name=Kubernetes
baseurl=https://packages.cloud.google.com/yum/repos/kubernetes-el7-x86_64
enabled=1
gpgcheck=1
repo_gpgcheck=1
gpgkey=https://packages.cloud.google.com/yum/doc/yum-key.gpg https://packages.cloud.google.com/yum/doc/rpm-package-key.gpg
exclude=kube*
EOF

yum install -y kubelet kubeadm kubectl --disableexcludes=kubernetes

systemctl enable --now kubelet

cat <<EOF >  /etc/sysctl.d/k8s.conf
net.bridge.bridge-nf-call-ip6tables = 1
net.bridge.bridge-nf-call-iptables = 1
EOF
sysctl --system
2.4.1.2. Worker Node
Các gói phần mềm và thiết lập trên các Worker Node k8s-worker01 (10.124.11.28) và k8s-worker02 (10.124.11.38) được cài và thực hiện giống với Master Node, ngoài trừ không cần phải cài kubectl ở bước cuối.
2.4.1.3. Lưu ý về thiết lập Firewall
Nếu chúng ta có thiết lập Firewall cho cho Master Node và Worker Node thì chúng ý mở các port tương ứng sau để Master Node và Worker Node có thể làm việc:
2.4.1.3.1. Master Node
| Giao thức | Hướng | Port | Mục đích sử dụng |
|---|---|---|---|
| TCP | Inbound | 6443 | Kubernetes API server |
| TCP | Inbound | 2379-2380 | etcd |
| TCP | Inbound | 10250 | Kubelet API |
| TCP | Inbound | 10251 | kube-scheduler |
| TCP | Inbound | 10252 | kube-controller-manager |
2.4.1.3.2. Worker Node
| Giao thức | Hướng | Port | Mục đích sử dụng |
|---|---|---|---|
| TCP | Inbound | 30000-32767 | NodePort Service |
| TCP | Inbound | 10250 | Kubelet API |
⚠️ Lưu ý: Nếu bạn đang chỉ cài Kubernetes Cluster để test, nhưng trên server/VM đang có sẵn các rule mặc định của iptables/firewalld và chưa biết cách thiết lập thêm các rule trên firewalld/iptables để mở các port trên, thì có thể tạm tắt nó. Ví dụ trên CentOS 7 để tắt firewalld thì dùng lệnh "systemctl stop firewalld && systemctl disable firewalld".
2.4.2. Thiết lập Kubernetes Cluster
2.4.2.1. Master Node
Chúng ta sẽ bắt đầu dùng kubeadm để bootstrap Master Node của Kubernetes Cluster, ở đây chúng ta dùng pod network plugin là Flannel. Chúng ta sẽ thực thi cách lệnh bên dưới trên VM k8s-master01 (10.124.11.17) với vùng mạng để các Pod giao tiếp với nhau là CIDR 10.244.0.0/16:
kubeadm init --pod-network-cidr=10.244.0.0/16 --apiserver-advertise-address=10.124.11.17
Kết quả tương tự như sau nếu khởi tạo thành công:
[root@k8s-master01 ~]# kubeadm init --pod-network-cidr=10.244.0.0/16 --apiserver-advertise-address=10.124.11.17
[init] Using Kubernetes version: v1.14.1
[preflight] Running pre-flight checks
[preflight] Pulling images required for setting up a Kubernetes cluster
[preflight] This might take a minute or two, depending on the speed of your internet connection
[preflight] You can also perform this action in beforehand using 'kubeadm config images pull'
[kubelet-start] Writing kubelet environment file with flags to file "/var/lib/kubelet/kubeadm-flags.env"
[kubelet-start] Writing kubelet configuration to file "/var/lib/kubelet/config.yaml"
[kubelet-start] Activating the kubelet service
[certs] Using certificateDir folder "/etc/kubernetes/pki"
[certs] Generating "front-proxy-ca" certificate and key
[certs] Generating "front-proxy-client" certificate and key
[certs] Generating "etcd/ca" certificate and key
[certs] Generating "etcd/peer" certificate and key
[certs] etcd/peer serving cert is signed for DNS names [k8s-master01.novalocal localhost] and IPs [10.124.11.17 127.0.0.1 ::1]
[certs] Generating "apiserver-etcd-client" certificate and key
[certs] Generating "etcd/server" certificate and key
[certs] etcd/server serving cert is signed for DNS names [k8s-master01.novalocal localhost] and IPs [10.124.11.17 127.0.0.1 ::1]
[certs] Generating "etcd/healthcheck-client" certificate and key
[certs] Generating "ca" certificate and key
[certs] Generating "apiserver" certificate and key
[certs] apiserver serving cert is signed for DNS names [k8s-master01.novalocal kubernetes kubernetes.default kubernetes.default.svc kubernetes.default.svc.cluster.local] and IPs [10.96.0.1 10.124.11.17]
[certs] Generating "apiserver-kubelet-client" certificate and key
[certs] Generating "sa" key and public key
[kubeconfig] Using kubeconfig folder "/etc/kubernetes"
[kubeconfig] Writing "admin.conf" kubeconfig file
[kubeconfig] Writing "kubelet.conf" kubeconfig file
[kubeconfig] Writing "controller-manager.conf" kubeconfig file
[kubeconfig] Writing "scheduler.conf" kubeconfig file
[control-plane] Using manifest folder "/etc/kubernetes/manifests"
[control-plane] Creating static Pod manifest for "kube-apiserver"
[control-plane] Creating static Pod manifest for "kube-controller-manager"
[control-plane] Creating static Pod manifest for "kube-scheduler"
[etcd] Creating static Pod manifest for local etcd in "/etc/kubernetes/manifests"
[wait-control-plane] Waiting for the kubelet to boot up the control plane as static Pods from directory "/etc/kubernetes/manifests". This can take up to 4m0s
[apiclient] All control plane components are healthy after 19.004865 seconds
[upload-config] storing the configuration used in ConfigMap "kubeadm-config" in the "kube-system" Namespace
[kubelet] Creating a ConfigMap "kubelet-config-1.14" in namespace kube-system with the configuration for the kubelets in the cluster
[upload-certs] Skipping phase. Please see --experimental-upload-certs
[mark-control-plane] Marking the node k8s-master01.novalocal as control-plane by adding the label "node-role.kubernetes.io/master=''"
[mark-control-plane] Marking the node k8s-master01.novalocal as control-plane by adding the taints [node-role.kubernetes.io/master:NoSchedule]
[bootstrap-token] Using token: iafoir.idbya6hdn8zbom6g
[bootstrap-token] Configuring bootstrap tokens, cluster-info ConfigMap, RBAC Roles
[bootstrap-token] configured RBAC rules to allow Node Bootstrap tokens to post CSRs in order for nodes to get long term certificate credentials
[bootstrap-token] configured RBAC rules to allow the csrapprover controller automatically approve CSRs from a Node Bootstrap Token
[bootstrap-token] configured RBAC rules to allow certificate rotation for all node client certificates in the cluster
[bootstrap-token] creating the "cluster-info" ConfigMap in the "kube-public" namespace
[addons] Applied essential addon: CoreDNS
[addons] Applied essential addon: kube-proxy

Your Kubernetes control-plane has initialized successfully!

To start using your cluster, you need to run the following as a regular user:

  mkdir -p $HOME/.kube
  sudo cp -i /etc/kubernetes/admin.conf $HOME/.kube/config
  sudo chown $(id -u):$(id -g) $HOME/.kube/config

You should now deploy a pod network to the cluster.
Run "kubectl apply -f [podnetwork].yaml" with one of the options listed at:
  https://kubernetes.io/docs/concepts/cluster-administration/addons/

Then you can join any number of worker nodes by running the following on each as root:

kubeadm join 10.124.11.17:6443 --token iafoir.idbya6hdn8zbom6g \
    --discovery-token-ca-cert-hash sha256:a5e5e06a17f58a74aafe0c3605da874c61ad1a85632d422f3a72da96b9d9b3c4
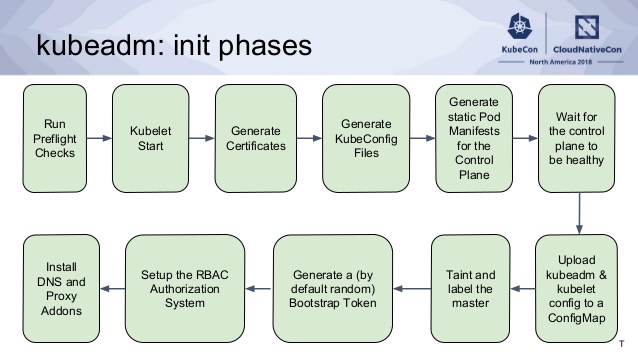
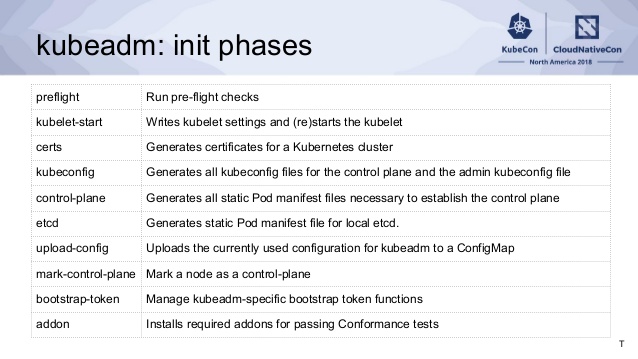
💡 Kiến thức bổ sung: Quá trình "kubeadm init" bao gồm nhiều giai đoạn khác nhau, các giai đoạn này có thể nhìn thấy ở kết quả đầu ra của lệnh bên trên hoặc ở 2 ảnh bên dưới minh họa sau đây (trích từ hội thảo Kubecon Seattle 2018).
📌 Chúng ta lưu trữ và bảo mật dòng "kubeadm join" ở đầu ra của lệnh kubeadm init dùng để join các worker node vào Kubernetes Cluster vừa tạo ở phần kế tiếp.
Chúng ta sẽ thiết lập kubectl để kết nối vào cụm Kubernetes Cluster vừa khởi tạo bên trên, ở đây chúng ta thiết lập trên kubectl cho user root trên Master Node nên chỉ cần export đường dẫn file config thông qua biến môi trường KUBECONFIG:
export KUBECONFIG=/etc/kubernetes/admin.conf
echo 'export KUBECONFIG=/etc/kubernetes/admin.conf' >> ~/.bash_profile
Chúng ta tiếp tục cài Flannel bằng lệnh sau ⬇️:
kubectl apply -f https://raw.githubusercontent.com/coreos/flannel/a70459be0084506e4ec919aa1c114638878db11b/Documentation/kube-flannel.yml
Kết quả khi cài Flannel thành công tương tự như sau:
[root@k8s-master01 ~]# kubectl apply -f https://raw.githubusercontent.com/coreos/flannel/a70459be0084506e4ec919aa1c114638878db11b/Documentation/kube-flannel.yml

clusterrole.rbac.authorization.k8s.io/flannel created
clusterrolebinding.rbac.authorization.k8s.io/flannel created
serviceaccount/flannel created
configmap/kube-flannel-cfg created
daemonset.extensions/kube-flannel-ds-amd64 created
daemonset.extensions/kube-flannel-ds-arm64 created
daemonset.extensions/kube-flannel-ds-arm created
daemonset.extensions/kube-flannel-ds-ppc64le created
daemonset.extensions/kube-flannel-ds-s390x created
Đến đây Master Node của Kubernetes Cluster mà chúng ta vừa khởi tạo đã sẵn sàng cho Worker Node tham gia (join) vào, chúng ta có thể kiểm tra trạng thái của Master Node như sau:
[root@k8s-master01 ~]# kubectl get nodes
NAME                     STATUS   ROLES    AGE    VERSION
k8s-master01.novalocal   Ready    master   9m8s   v1.14.1
Lưu ý: Mặc định Kubernetes Cluster sẽ không tạo Pod trên Master vì lý do bảo mật, nếu chúng ta muốn dùng ngay Kubernetes Cluster mà không cần join thêm Worker Node thì có thể vô hiệu thiết lập này để có thể tạo Pod ở Master bằng lệnh "kubectl taint nodes --all node-role.kubernetes.io/master-"
2.4.2.2. Worker Node
Worker Node có thể tham gia (join) vào Kubernetes Cluster hiện có thông qua lệnh kubeadm join với cú pháp như sau:
kubeadm join --token <token> <master-ip>:<master-port> --discovery-token-ca-cert-hash sha256:<hash>
token: Token có thể tạo bằng lệnhkubeadm token create(token được tạo ra sẽ mặc định hết hiệu lực sau 24 giờ) hoặc liệt kê các token đang có trên Cluster bằng lệnhkubeadm token list.discovery-token-ca-cert-hash: Giá trị này có thể lấy từ lệnh tương tự sau ⬇️.openssl x509 -pubkey -in /etc/kubernetes/pki/ca.crt | openssl rsa -pubin -outform der 2>/dev/null | \ openssl dgst -sha256 -hex | sed 's/^.* //'<master-ip>:<master-port>: địa chỉ IP và port của Master Node, master-port mặc đình là 6443.
Tuy nhiên, nếu chúng ta vừa tạo Kubernetes Cluster bằng kubeadm trong vòng 24 giờ và vẫn còn lưu lệnh kubeadm join ở kết quả đầu ra của lệnh kubeadm init tương tự ở mục 2.4.2.1 thì chúng ta vẫn có thể dùng lệnh này để join các Worker Node vào Cluster mà không cần tạo lại token và lấy discovery-token-ca-cert-hash.
Chúng ta thực hiện lệnh sau trên lần lượt Worker Node k8s-worker01 (10.124.11.28) và k8s-worker02 (10.124.11.38) ⬇️:
kubeadm join 10.124.11.17:6443 --token iafoir.idbya6hdn8zbom6g \
    --discovery-token-ca-cert-hash sha256:a5e5e06a17f58a74aafe0c3605da874c61ad1a85632d422f3a72da96b9d9b3c4
Kết quả khi join thành công tương tự như sau ⬇️:
Worker Node k8s-worker01 (10.124.11.28):
[root@k8s-worker01 ~]# kubeadm join 10.124.11.17:6443 --token iafoir.idbya6hdn8zbom6g \
>     --discovery-token-ca-cert-hash sha256:a5e5e06a17f58a74aafe0c3605da874c61ad1a85632d422f3a72da96b9d9b3c4
[preflight] Running pre-flight checks
[preflight] Reading configuration from the cluster...
[preflight] FYI: You can look at this config file with 'kubectl -n kube-system get cm kubeadm-config -oyaml'
[kubelet-start] Downloading configuration for the kubelet from the "kubelet-config-1.14" ConfigMap in the kube-system namespace
[kubelet-start] Writing kubelet configuration to file "/var/lib/kubelet/config.yaml"
[kubelet-start] Writing kubelet environment file with flags to file "/var/lib/kubelet/kubeadm-flags.env"
[kubelet-start] Activating the kubelet service
[kubelet-start] Waiting for the kubelet to perform the TLS Bootstrap...

This node has joined the cluster:
* Certificate signing request was sent to apiserver and a response was received.
* The Kubelet was informed of the new secure connection details.

Run 'kubectl get nodes' on the control-plane to see this node join the cluster.
Worker Node k8s-worker02 (10.124.11.38) ⬇️:
[root@k8s-worker02 ~]# kubeadm join 10.124.11.17:6443 --token iafoir.idbya6hdn8zbom6g \
>     --discovery-token-ca-cert-hash sha256:a5e5e06a17f58a74aafe0c3605da874c61ad1a85632d422f3a72da96b9d9b3c4
[preflight] Running pre-flight checks
[preflight] Reading configuration from the cluster...
[preflight] FYI: You can look at this config file with 'kubectl -n kube-system get cm kubeadm-config -oyaml'
[kubelet-start] Downloading configuration for the kubelet from the "kubelet-config-1.14" ConfigMap in the kube-system namespace
[kubelet-start] Writing kubelet configuration to file "/var/lib/kubelet/config.yaml"
[kubelet-start] Writing kubelet environment file with flags to file "/var/lib/kubelet/kubeadm-flags.env"
[kubelet-start] Activating the kubelet service
[kubelet-start] Waiting for the kubelet to perform the TLS Bootstrap...

This node has joined the cluster:
* Certificate signing request was sent to apiserver and a response was received.
* The Kubelet was informed of the new secure connection details.

Run 'kubectl get nodes' on the control-plane to see this node join the cluster.
Kiểm tra trạng thái các Worker Node trên Master Node: Worker Node có thể mất từ 5 đến 10 phút để có trạng thái
Ready, nếu quá thời gian trên mà vẫn chưa có trạng thái này thì chúng ta cần kiểm tra lại từng bước một để xác định lỗi.[root@k8s-master01 ~]# kubectl get nodes NAME STATUS ROLES AGE VERSION k8s-master01.novalocal Ready master 42m v1.14.1 k8s-worker01.novalocal Ready <none> 11m v1.14.1 k8s-worker02.novalocal Ready <none> 11m v1.14.1 [root@k8s-master01 ~]# kubectl get pods --all-namespaces NAMESPACE NAME READY STATUS RESTARTS AGE kube-system coredns-fb8b8dccf-64gp9 1/1 Running 0 42m kube-system coredns-fb8b8dccf-8x822 1/1 Running 0 42m kube-system etcd-k8s-master01.novalocal 1/1 Running 0 41m kube-system kube-apiserver-k8s-master01.novalocal 1/1 Running 0 41m kube-system kube-controller-manager-k8s-master01.novalocal 1/1 Running 0 41m kube-system kube-flannel-ds-amd64-fp9fg 1/1 Running 0 11m kube-system kube-flannel-ds-amd64-t25kv 1/1 Running 0 34m kube-system kube-flannel-ds-amd64-xf9nv 1/1 Running 0 11m kube-system kube-proxy-5pc9q 1/1 Running 0 11m kube-system kube-proxy-8n68k 1/1 Running 0 11m kube-system kube-proxy-f7gmg 1/1 Running 0 42m kube-system kube-scheduler-k8s-master01.novalocal 1/1 Running 0 41m
Đến đây chúng ta đã có một Multi-Node Kubernetes Cluster (single master) sẵn sàng ✅ hoàn toàn.
2.5. kops
kops là công cụ tạo và quản lý Kubernetes Cluster trong môi trường Production trên các hạ tầng Public Cloud như AWS, GCE hay Digital Ocean (các nền tảng khác cũng được lên kế hoạch hỗ trợ sớm). kops mang lại các tính năng nổi bật như sau:
Tự động hóa quá trình khởi tạo Kubernetes Cluster trên AWS, GCE hay DO.
Triển khai HA cho Kubernetes Master.
Khả năng tích hợp Terraform.
Hỗ trợ hầu hết các CNI phổ biến.
Trong bài này, chúng ta sẽ khởi tạo một Kubernetes Cluster trên AWS bao gồm 3 master và 6 worker node, do là ví dụ nên chúng ta đều dùng instance loại t3.medium cho cả master và worker node. AWS Region trong bài sử dụng là us-east-1 (có thể dùng lệnh aws ec2 describe-availability-zones để xem thông tin về các zone trong Region hiện tại ).
2.5.1. Cài đặt và cấu hình AWS CLI
AWS CLI là công cụ cho phép quản lý các dịch vụ Amazon Web Services từ giao diện dòng lệnh và kết nối trực tiếp đến AWS API. Để cài đặt AWS CLI thì chúng ta có thể cài qua trình quản lý gói của hệ điều hành hoặc dùng pip của Python:
Cài đặt bằng trình quản lý gói:
sudo apt-get update
sudo apt-get install awscli
Cài đặt bằng pip:
sudo apt install python-pip
pip install awscli --upgrade --user
Tiếp đến, chúng ta cấu hình thông tin kết nối cho AWS CLI bằng lệnh sau:
aws configure
Khi chạy lệnh trên, chúng ta cần cung cấp các thông tin như AWS Access Key ID, AWS Secret Access Key và Region.
2.5.2. Cài đặt kops
kops có thể chạy được trên nhiều hệ điều hành từ Linux, Windows đến macOS. Ví dụ sau này được thực hiện trên máy trạm dùng Ubuntu, kops yêu cầu trên máy chạy kops phải có kubectl cài đặt sẵn, có thể tham khảo cách cài đặt kubectl.
kops có thể chạy trực tiếp từ tập tin binary, việc cài đặt kops chỉ đơn giản chỉ tải về và chạy, kops hoàn toàn chạy được dưới quyền người dùng bình thường. Chúng ta thực hiện cài kops dùng lệnh sau:
curl -LO https://github.com/kubernetes/kops/releases/download/$(curl -s https://api.github.com/repos/kubernetes/kops/releases/latest | grep tag_name | cut -d '"' -f 4)/kops-linux-amd64
chmod +x kops-linux-amd64
sudo mv kops-linux-amd64 /usr/local/bin/kops
2.5.3. Khởi tạo Kubernetes Cluster trên AWS
Trong ví dụ này chúng ta khởi tạo Kubernetes Cluster dùng Gossip Protocol mà kops hỗ trợ, nên không cần kết nối một domain name với AWS Route53, chúng ta chỉ cần đặt tên của Kubernetes Cluster kết thúc bằng "k8s.local", ở đây tên của Kubernetes Cluster ví dụ là "blogd.k8s.local".
Khởi tạo người dùng và thiết lập quyền cho kops tại AWS IAM ⬇️
aws iam create-group --group-name kops

aws iam attach-group-policy --policy-arn arn:aws:iam::aws:policy/AmazonEC2FullAccess --group-name kops
aws iam attach-group-policy --policy-arn arn:aws:iam::aws:policy/AmazonRoute53FullAccess --group-name kops
aws iam attach-group-policy --policy-arn arn:aws:iam::aws:policy/AmazonS3FullAccess --group-name kops
aws iam attach-group-policy --policy-arn arn:aws:iam::aws:policy/IAMFullAccess --group-name kops
aws iam attach-group-policy --policy-arn arn:aws:iam::aws:policy/AmazonVPCFullAccess --group-name kops

aws iam create-user --user-name kops
aws iam add-user-to-group --user-name kops --group-name kops
aws iam create-access-key --user-name kops
Khởi tạo SSH Keypair (nếu đã có SSH Public Key rồi thì có thể bỏ qua bước này) ⬇️
sudo apt-get install jq
aws ec2 create-key-pair --key-name blogd_k8s | jq -r '.KeyMaterial' > ~/.ssh/blogd_k8s.pem
chmod 400 ~/.ssh/blogd_k8s.pem
ssh-keygen -y -f ~/.ssh/blogd_k8s.pem > ~/.ssh/blogd_k8s.pub
Khởi tạo AWS S3 Bucket để lưu thông tin cấu hình của kops và bản sao lưu (backup) của etcd ⬇️
aws s3api create-bucket --bucket blogd.k8s.localCấu hình các biến môi trường để thực hiện các lệnh của kops nhanh chóng hơn ⬇️
export NAME=blogd.k8s.local
export KOPS_STATE_STORE=s3://$NAME
echo "export KOPS_STATE_STORE=s3://$NAME" >> .bashrc
Khởi tạo Kubernetes Cluster ⬇️
kops create cluster \
--cloud aws \
--networking kubenet \
--name $NAME \
--master-count 3 \
--master-size t3.medium \
--node-size t3.medium \
--node-count 6 \
--zones "us-east-1a,us-east-1f,us-east-1c" \
--ssh-public-key ~/.ssh/blogd_k8s.pub \
--yes
Khi thực hiện lệnh trên chúng ta sẽ thu được kết quả đầu ra tương tự như sau:
   I0601 18:52:02.293384   21246 create_cluster.go:1486] Using SSH public key: /home/hien/.ssh/blogd_k8s.pub
   I0601 18:52:05.854718   21246 subnets.go:184] Assigned CIDR 172.20.32.0/19 to subnet us-east-1a
   I0601 18:52:05.854961   21246 subnets.go:184] Assigned CIDR 172.20.64.0/19 to subnet us-east-1c
   I0601 18:52:05.855106   21246 subnets.go:184] Assigned CIDR 172.20.96.0/19 to subnet us-east-1f
   I0601 18:52:15.950829   21246 apply_cluster.go:559] Gossip DNS: skipping DNS validation
   I0601 18:52:19.689858   21246 executor.go:103] Tasks: 0 done / 104 total; 46 can run
   I0601 18:52:24.323710   21246 vfs_castore.go:729] Issuing new certificate: "etcd-peers-ca-events"
   I0601 18:52:25.269572   21246 vfs_castore.go:729] Issuing new certificate: "etcd-manager-ca-events"
   I0601 18:52:25.527310   21246 vfs_castore.go:729] Issuing new certificate: "etcd-clients-ca"
   I0601 18:52:26.515504   21246 vfs_castore.go:729] Issuing new certificate: "apiserver-aggregator-ca"
   I0601 18:52:27.098965   21246 vfs_castore.go:729] Issuing new certificate: "ca"
   I0601 18:52:27.147344   21246 vfs_castore.go:729] Issuing new certificate: "etcd-peers-ca-main"
   I0601 18:52:27.492848   21246 vfs_castore.go:729] Issuing new certificate: "etcd-manager-ca-main"
   I0601 18:52:29.509804   21246 executor.go:103] Tasks: 46 done / 104 total; 26 can run
   I0601 18:52:34.166556   21246 vfs_castore.go:729] Issuing new certificate: "kubecfg"
   I0601 18:52:34.299811   21246 vfs_castore.go:729] Issuing new certificate: "apiserver-aggregator"
   I0601 18:52:35.339266   21246 vfs_castore.go:729] Issuing new certificate: "kube-proxy"
   I0601 18:52:35.545000   21246 vfs_castore.go:729] Issuing new certificate: "apiserver-proxy-client"
   I0601 18:52:37.124388   21246 vfs_castore.go:729] Issuing new certificate: "kube-scheduler"
   I0601 18:52:37.793750   21246 vfs_castore.go:729] Issuing new certificate: "kube-controller-manager"
   I0601 18:52:37.927723   21246 vfs_castore.go:729] Issuing new certificate: "kubelet-api"
   I0601 18:52:38.224976   21246 vfs_castore.go:729] Issuing new certificate: "kops"
   I0601 18:52:38.393959   21246 vfs_castore.go:729] Issuing new certificate: "kubelet"
   I0601 18:52:40.547915   21246 executor.go:103] Tasks: 72 done / 104 total; 24 can run
   I0601 18:52:44.709916   21246 executor.go:103] Tasks: 96 done / 104 total; 5 can run
   I0601 18:52:48.645021   21246 vfs_castore.go:729] Issuing new certificate: "master"
   I0601 18:52:50.618947   21246 executor.go:103] Tasks: 101 done / 104 total; 3 can run
   I0601 18:52:52.004006   21246 executor.go:103] Tasks: 104 done / 104 total; 0 can run
   I0601 18:52:52.413119   21246 update_cluster.go:291] Exporting kubecfg for cluster
   kops has set your kubectl context to blogd.k8s.local

   Cluster is starting.  It should be ready in a few minutes.

   Suggestions:
    * validate cluster: kops validate cluster
    * list nodes: kubectl get nodes --show-labels
    * ssh to the master: ssh -i ~/.ssh/id_rsa admin@api.blogd.k8s.local
    * the admin user is specific to Debian. If not using Debian please use the appropriate user based on your OS.
    * read about installing addons at: https://github.com/kubernetes/kops/blob/master/docs/addons.md.
AWS mất khoảng 5 phút để khởi tạo, chúng ta có thể theo dõi tiến trình qua lệnh kops validate cluster xem Kubernetes Cluster vừa khởi tạo bên trên đã sẵn sàng chưa nhé:
   hien@ubuntu-bastion01:~$ kops validate cluster
   Using cluster from kubectl context: blogd.k8s.local

   Validating cluster blogd.k8s.local

   INSTANCE GROUPS
   NAME			ROLE	MACHINETYPE	MIN	MAX	SUBNETS
   master-us-east-1a	Master	t3.medium	1	1	us-east-1a
   master-us-east-1c	Master	t3.medium	1	1	us-east-1c
   master-us-east-1f	Master	t3.medium	1	1	us-east-1f
   nodes			Node	t3.medium	6	6	us-east-1a,us-east-1c,us-east-1f

   NODE STATUS
   NAME				ROLE	READY
   ip-172-20-123-200.ec2.internal	master	True
   ip-172-20-85-255.ec2.internal	master	True

   VALIDATION ERRORS
   KIND	NAME							MESSAGE
   Machine	i-010fe7a310ebc2b9a					machine "i-010fe7a310ebc2b9a" has not yet joined cluster
   Machine	i-014f42f645286453f					machine "i-014f42f645286453f" has not yet joined cluster
   Machine	i-024919ceae8a97529					machine "i-024919ceae8a97529" has not yet joined cluster
   Machine	i-03cf33be622164d16					machine "i-03cf33be622164d16" has not yet joined cluster
   Machine	i-0660ad853502c742a					machine "i-0660ad853502c742a" has not yet joined cluster
   Machine	i-0a4c0a3d56df8e759					machine "i-0a4c0a3d56df8e759" has not yet joined cluster
   Machine	i-0b37feb195e80a29e					machine "i-0b37feb195e80a29e" has not yet joined cluster
   Pod	kube-system/kube-dns-57dd96bb49-2q99k			kube-system pod "kube-dns-57dd96bb49-2q99k" is pending
   Pod	kube-system/kube-dns-autoscaler-867b9fd49d-xhhtt	kube-system pod "kube-dns-autoscaler-867b9fd49d-xhhtt" is pending

   Validation Failed
   hien@ubuntu-bastion01:~$ date
   Sat Jun  1 18:56:42 +07 2019
   hien@ubuntu-bastion01:~$ kops validate cluster
   Using cluster from kubectl context: blogd.k8s.local

   Validating cluster blogd.k8s.local

   INSTANCE GROUPS
   NAME			ROLE	MACHINETYPE	MIN	MAX	SUBNETS
   master-us-east-1a	Master	t3.medium	1	1	us-east-1a
   master-us-east-1c	Master	t3.medium	1	1	us-east-1c
   master-us-east-1f	Master	t3.medium	1	1	us-east-1f
   nodes			Node	t3.medium	6	6	us-east-1a,us-east-1c,us-east-1f

   NODE STATUS
   NAME				ROLE	READY
   ip-172-20-117-180.ec2.internal	node	True
   ip-172-20-123-200.ec2.internal	master	True
   ip-172-20-33-187.ec2.internal	node	True
   ip-172-20-49-233.ec2.internal	node	True
   ip-172-20-63-188.ec2.internal	master	True
   ip-172-20-82-109.ec2.internal	node	True
   ip-172-20-85-255.ec2.internal	master	True
   ip-172-20-92-198.ec2.internal	node	True
   ip-172-20-97-237.ec2.internal	node	True

   Your cluster blogd.k8s.local is ready
   hien@ubuntu-bastion01:~$ date
   Sat Jun  1 18:58:51 +07 2019
   hien@ubuntu-bastion01:~$
Đến đây, Kubernetes Cluster mà chúng ta vừa khởi tạo bằng kops đã sẵn sàng, đây là Kubernetes Multi-Master và có độ sẵn sàng cao (HA) mà kops đã thiết lập kết hợp với tính năng Auto Scaling group của AWS EC2. Chúng ta có thể sử dụng kubectl để tương tác với Kubernetes Cluster vừa tạo, khi kops khởi tạo xong thì kops đã tự động cấu hình thông tin kết nối cho kubectl, vì thế chúng ta không cần cấu hình gì cho kubectl nữa:
   hien@ubuntu-bastion01:~$ kubectl cluster-info
   Kubernetes master is running at https://api-blogd-k8s-local-kq8l1g-1139736250.us-east-1.elb.amazonaws.com
   KubeDNS is running at https://api-blogd-k8s-local-kq8l1g-1139736250.us-east-1.elb.amazonaws.com/api/v1/namespaces/kube-system/services/kube-dns:dns/proxy

   To further debug and diagnose cluster problems, use 'kubectl cluster-info dump'.
   hien@ubuntu-bastion01:~$ kubectl get nodes -o wide
   NAME                             STATUS   ROLES    AGE     VERSION   INTERNAL-IP      EXTERNAL-IP      OS-IMAGE                       KERNEL-VERSION   CONTAINER-RUNTIME
   ip-172-20-117-180.ec2.internal   Ready    node     6m4s    v1.12.7   172.20.117.180   35.172.218.109   Debian GNU/Linux 9 (stretch)   4.9.0-9-amd64    docker://18.6.3
   ip-172-20-123-200.ec2.internal   Ready    master   6m58s   v1.12.7   172.20.123.200   18.205.67.168    Debian GNU/Linux 9 (stretch)   4.9.0-9-amd64    docker://18.6.3
   ip-172-20-33-187.ec2.internal    Ready    node     6m5s    v1.12.7   172.20.33.187    3.88.146.42      Debian GNU/Linux 9 (stretch)   4.9.0-9-amd64    docker://18.6.3
   ip-172-20-49-233.ec2.internal    Ready    node     6m1s    v1.12.7   172.20.49.233    54.88.143.189    Debian GNU/Linux 9 (stretch)   4.9.0-9-amd64    docker://18.6.3
   ip-172-20-63-188.ec2.internal    Ready    master   6m24s   v1.12.7   172.20.63.188    54.198.50.48     Debian GNU/Linux 9 (stretch)   4.9.0-9-amd64    docker://18.6.3
   ip-172-20-82-109.ec2.internal    Ready    node     6m1s    v1.12.7   172.20.82.109    3.86.146.241     Debian GNU/Linux 9 (stretch)   4.9.0-9-amd64    docker://18.6.3
   ip-172-20-85-255.ec2.internal    Ready    master   7m1s    v1.12.7   172.20.85.255    3.84.34.240      Debian GNU/Linux 9 (stretch)   4.9.0-9-amd64    docker://18.6.3
   ip-172-20-92-198.ec2.internal    Ready    node     6m5s    v1.12.7   172.20.92.198    54.158.124.83    Debian GNU/Linux 9 (stretch)   4.9.0-9-amd64    docker://18.6.3
   ip-172-20-97-237.ec2.internal    Ready    node     6m      v1.12.7   172.20.97.237    18.207.134.163   Debian GNU/Linux 9 (stretch)   4.9.0-9-amd64    docker://18.6.3
   hien@ubuntu-bastion01:~$ kubectl get pods --all-namespaces --show-labels -o wide
   NAMESPACE     NAME                                                     READY   STATUS    RESTARTS   AGE     IP               NODE                             NOMINATED NODE   LABELS
   kube-system   dns-controller-64b775df4d-2vwcc                          1/1     Running   0          7m28s   172.20.85.255    ip-172-20-85-255.ec2.internal    <none>           k8s-addon=dns-controller.addons.k8s.io,k8s-app=dns-controller,pod-template-hash=64b775df4d,version=v1.12.0
   kube-system   etcd-manager-events-ip-172-20-123-200.ec2.internal       1/1     Running   0          7m12s   172.20.123.200   ip-172-20-123-200.ec2.internal   <none>           k8s-app=etcd-manager-events
   kube-system   etcd-manager-events-ip-172-20-63-188.ec2.internal        1/1     Running   0          6m5s    172.20.63.188    ip-172-20-63-188.ec2.internal    <none>           k8s-app=etcd-manager-events
   kube-system   etcd-manager-events-ip-172-20-85-255.ec2.internal        1/1     Running   0          6m56s   172.20.85.255    ip-172-20-85-255.ec2.internal    <none>           k8s-app=etcd-manager-events
   kube-system   etcd-manager-main-ip-172-20-123-200.ec2.internal         1/1     Running   0          6m53s   172.20.123.200   ip-172-20-123-200.ec2.internal   <none>           k8s-app=etcd-manager-main
   kube-system   etcd-manager-main-ip-172-20-63-188.ec2.internal          1/1     Running   0          6m40s   172.20.63.188    ip-172-20-63-188.ec2.internal    <none>           k8s-app=etcd-manager-main
   kube-system   etcd-manager-main-ip-172-20-85-255.ec2.internal          1/1     Running   0          7m1s    172.20.85.255    ip-172-20-85-255.ec2.internal    <none>           k8s-app=etcd-manager-main
   kube-system   kube-apiserver-ip-172-20-123-200.ec2.internal            1/1     Running   3          6m37s   172.20.123.200   ip-172-20-123-200.ec2.internal   <none>           k8s-app=kube-apiserver
   kube-system   kube-apiserver-ip-172-20-63-188.ec2.internal             1/1     Running   3          5m54s   172.20.63.188    ip-172-20-63-188.ec2.internal    <none>           k8s-app=kube-apiserver
   kube-system   kube-apiserver-ip-172-20-85-255.ec2.internal             1/1     Running   3          6m52s   172.20.85.255    ip-172-20-85-255.ec2.internal    <none>           k8s-app=kube-apiserver
   kube-system   kube-controller-manager-ip-172-20-123-200.ec2.internal   1/1     Running   0          6m57s   172.20.123.200   ip-172-20-123-200.ec2.internal   <none>           k8s-app=kube-controller-manager
   kube-system   kube-controller-manager-ip-172-20-63-188.ec2.internal    1/1     Running   0          5m56s   172.20.63.188    ip-172-20-63-188.ec2.internal    <none>           k8s-app=kube-controller-manager
   kube-system   kube-controller-manager-ip-172-20-85-255.ec2.internal    1/1     Running   0          7m27s   172.20.85.255    ip-172-20-85-255.ec2.internal    <none>           k8s-app=kube-controller-manager
   kube-system   kube-dns-57dd96bb49-2q99k                                3/3     Running   0          7m28s   100.96.3.3       ip-172-20-92-198.ec2.internal    <none>           k8s-app=kube-dns,pod-template-hash=57dd96bb49
   kube-system   kube-dns-57dd96bb49-gsmll                                3/3     Running   0          6m42s   100.96.4.2       ip-172-20-33-187.ec2.internal    <none>           k8s-app=kube-dns,pod-template-hash=57dd96bb49
   kube-system   kube-dns-autoscaler-867b9fd49d-xhhtt                     1/1     Running   0          7m28s   100.96.3.2       ip-172-20-92-198.ec2.internal    <none>           k8s-app=kube-dns-autoscaler,pod-template-hash=867b9fd49d
   kube-system   kube-proxy-ip-172-20-117-180.ec2.internal                1/1     Running   0          5m57s   172.20.117.180   ip-172-20-117-180.ec2.internal   <none>           k8s-app=kube-proxy,tier=node
   kube-system   kube-proxy-ip-172-20-123-200.ec2.internal                1/1     Running   0          7m18s   172.20.123.200   ip-172-20-123-200.ec2.internal   <none>           k8s-app=kube-proxy,tier=node
   kube-system   kube-proxy-ip-172-20-33-187.ec2.internal                 1/1     Running   0          6m26s   172.20.33.187    ip-172-20-33-187.ec2.internal    <none>           k8s-app=kube-proxy,tier=node
   kube-system   kube-proxy-ip-172-20-49-233.ec2.internal                 1/1     Running   0          5m33s   172.20.49.233    ip-172-20-49-233.ec2.internal    <none>           k8s-app=kube-proxy,tier=node
   kube-system   kube-proxy-ip-172-20-63-188.ec2.internal                 1/1     Running   0          6m3s    172.20.63.188    ip-172-20-63-188.ec2.internal    <none>           k8s-app=kube-proxy,tier=node
   kube-system   kube-proxy-ip-172-20-82-109.ec2.internal                 1/1     Running   0          6m7s    172.20.82.109    ip-172-20-82-109.ec2.internal    <none>           k8s-app=kube-proxy,tier=node
   kube-system   kube-proxy-ip-172-20-85-255.ec2.internal                 1/1     Running   0          7m22s   172.20.85.255    ip-172-20-85-255.ec2.internal    <none>           k8s-app=kube-proxy,tier=node
   kube-system   kube-proxy-ip-172-20-92-198.ec2.internal                 1/1     Running   0          6m4s    172.20.92.198    ip-172-20-92-198.ec2.internal    <none>           k8s-app=kube-proxy,tier=node
   kube-system   kube-proxy-ip-172-20-97-237.ec2.internal                 1/1     Running   0          6m21s   172.20.97.237    ip-172-20-97-237.ec2.internal    <none>           k8s-app=kube-proxy,tier=node
   kube-system   kube-scheduler-ip-172-20-123-200.ec2.internal            1/1     Running   0          6m45s   172.20.123.200   ip-172-20-123-200.ec2.internal   <none>           k8s-app=kube-scheduler
   kube-system   kube-scheduler-ip-172-20-63-188.ec2.internal             1/1     Running   0          6m28s   172.20.63.188    ip-172-20-63-188.ec2.internal    <none>           k8s-app=kube-scheduler
   kube-system   kube-scheduler-ip-172-20-85-255.ec2.internal             1/1     Running   0          7m27s   172.20.85.255    ip-172-20-85-255.ec2.internal    <none>           k8s-app=kube-scheduler
Ngoài ra kops hỗ trợ khá nhiều lệnh liên quan quản lý và vận hành Kubernetes Cluster, có thể tham khảo tài liệu chính thức của kops tại đây.
Nếu không còn sử dụng Kubernetes Cluster bên trên nữa thì có thể xóa dùng lệnh sau (Lưu ý lệnh này sẽ làm mất hoàn toàn dữ liệu nếu có):
kops delete cluster blogd.k8s.local --yes
kops hỗ trợ rất tốt khi triển khai Kubernetes Cluster trên các Public Cloud Provider phổ biến như AWS, Google Cloud hay Digital Ocean. Tuy nhiên đây cũng là nhược điểm lớn nhất của kops, vì hầu hết các thao tác mà kops thực hiện tự động hóa phụ thuộc phần lớn vào API mà Public Cloud Provider cung cấp. Nếu muốn giảm bớt sự phụ thuộc này thì có thể tham khảo công cụ kubespray.
3. Lời kết
Có rất nhiều cách để cài đặt một Kubernetes Cluster, tuy nhiên dựa vào nhu cầu của mỗi đọc giả nên bài viết này hướng dẫn khá nhiều cách phổ biến:
Minikube: tạo Single-Node Kubernetes Cluster dùng ảo hóa (hạn chế tác động đến máy/server của người dùng), chạy tương đối nặng do phải tạo thêm VM. Thích hợp cho người dùng muốn trải nghiệm Kubernetes mà ít gặp lỗi khi khởi tạo Kubernetes Cluster lần đầu tiên 😍.
Microk8s: tương tự như Minikube nhưng không sử dụng ảo hóa cồng kềnh, hỗ trợ nhiều addon có sẵn hơn, ví dụ Istio. Tuy nhiên vẫn còn nhiều lỗi 😂.
kind: khá nhẹ nhàng và nhanh chóng, tuy nhiên đang còn đang phát triển 👶🏻.
kubeadm: thích hợp cho ai muốn tìm hiểu sâu về Kubernetes ❤️ ở cách thức hoạt động và cách thành phần nhưng chưa có đủ thời gian hay kiến thức để thiết lập một Kubernetes Cluster bằng tay 100% 😭.
kops: thích hợp nếu cần triển khai tự động hoàn toàn Kubernetes Cluster trên AWS, GCE hay DO 👍.
Còn chần chừ gì nữa, hãy thiết lập ngay cho mình một Kubernetes Cluster để sẵn sàng thực hành loạt bài chia sẻ về Kubernetes trên blogd.net sắp tới 🎉.